As Alpha Particle has grown over the years, we’ve gotten so many opportunities, made friends and even gotten clients from our connections to and in the WordPress community. Whether you’re starting an agency, already work in WordPress or just want to get involved, below you’ll find my recommendations for people to follow and ways to participate in the larger WordPress community.
Twitter/X
Despite Twitter getting rebranded to X and many people who were historically on the platform leaving, it’s still a great place to get WordPress news and, more importantly, connect with specific people doing interesting work in WordPress. There are some Twitter lists you can follow if you want, but I’ve built up the people I’m following over time by seeing who’s engaging and posting about WordPress topics, who has great replies and who is doing really interesting work and sharing it. This has been made easier recently, as the algorithm now shows you more people that you don’t specifically follow.
Education
Especially with WordPress changing so fast, keeping on top of what’s going on and how you can apply new techniques and technologies is very important. Here are some of the resources we use:
learn.wordpress.org – The official repository of WordPress knowledge, there are lessons on here for all things WordPress and it’s a great place to start, especially if you’re looking to learn just a specific topic like Custom Database Tables.
10up’s Gutenberg Best Practices – As we’ve leaned into the Block Editor and started on our journey to building sites with Full Site Editing, this has been a great resource to see how another agency manages block development and building modern WordPress sites. And speaking of Full Site editing…
Fullsiteediting.com – One of the best resources for learning everything about Full Site Editing and how to build sites in this new WordPress paradigm.
Laracasts – This isn’t a free resource and it’s not WordPress-specific, so it’s a bit different than some of the others on this list. However, Laracasts has all sorts of lessons on PHP topics, how to get the most out of your code editor and more. Especially for the amount of content available, it’s one of the best developer resources I’ve come across in my career.
Podcasts
Podcasts are a great resource for hearing real people talk about their experiences with WordPress, how they solve problems or think about concepts and more. Here are some of my favorites:
View Source – I love how this podcast doesn’t always stick to WordPress topics, but relates everything back for their WordPress-centric audience. I love the topics Aurooba and Brian choose and it’s obvious that they’re working in WordPress every day because they present on the questions they’re having and the topics they care about and as a result are relevant to their audience.
WP Coffee Talk – Maybe I’m biased because I’ve been one of Michelle’s guests, but this long-running podcast is a great way to learn about specific people in WordPress, how they got started and why they love the community and working with WordPress every day.
WP Watercooler – Always topical, always with great insights and opinions and overall a great listen to keep up with what’s going on in the community.
Do the Woo – Despite the name, even if you’re involved with WooCommerce (or I guess just Woo now), this podcast has great episodes focusing on development topics, shows about running a business and more.
Slack Teams
Post Status – Probably considered the WordPress professionals organization at this point, Post Status is a great place to hang out, network and get your questions answered. Seriously, I had a Laravel question at 2AM when I was on a client deadline and someone was able to jump in and help me out (thank you, timezones).
The WP Minute – There’s no better place to stay up-to-date with WordPress news than the WP Minute. And the Slack team that’s part of that feels like how I imagine being inside the writer’s room at SNL would be. (And yes, Matt, this is my permission for you to use this as a testimonial if you like).
Make WordPress – This is where all the major work on WordPress happens. It’s a Slack team for now, but there’s been discussions of moving that over to some other platform. Regardless, if you want to chat with the teams who are actually making decisions, participate in meetings and help make some of those decisions yourself, this is the place to go.
WordCamps
WordCamps were how we got our start at Alpha Particle. By attending WordCamps all across the country, we got a chance to meet a number of people that would be instrumental in keeping us connected to the WordPress community and helping us grow our business. Although WordCamps may look different in this post-2020 world, if you do decide to attend, I would have three main recommendations:
Apply to speak: WordCamps are always looking for speakers. If you haven’t given a talk at a WordCamp before, many of the speaker selection committees have resources for first-time speakers, will help you craft your talk proposals and more! Speaking at WordCamps has been one of my experiences throughout my time in WordPress and, often, the sponsor/speaker dinner is my favorite and most valuable part of the entire event.
Don’t skip out on the hallway track: This is frequently-given advice, to not miss out on casual hallway conversations. I noticed that, even though I heard this before my first WordCamp, it was difficult to follow when I knew literally 0 people at the conference. I will say, this is one of the great things about getting more involved in the community. As you go to more conferences and connect with more people at Meetups and on Twitter, there are more likely to be people you already know at your next WordCamp. This makes it easier to start these informal conversations and reconnect. Just make sure to being other people you don’t know into these conversations as well so that they can get involved, just like you did.
Try to attend or even host some informal events: WordCamps have a long history of “informal” events. Things like karaoke or going out to dinner “off campus” happen all the time at WordCamps. These are usually smaller group events, not organized by or associated with a given WordCamp other than the fact that everyone in attendance is there for the WordCamp. Because of their small size, they are a great way to get to know people, or connect more deeply with someone you had a casual conversation with earlier in the day. As you start attending more WordCamps, you’ll likely have the opportunity to attend some of these events. But if you haven’t heard about anything and have a free night, why not organize your own? It’s also a great way to explore something in your host city that you wouldn’t have gotten a chance to see if you had just gone to the conference events.
SVGs (Scalable Vector Graphics) are a great file format for making sure that images look good at any size! Because they’re defined with code, they can scale to any size but since they’re also an image format, they can be used in any standard image tag, like so:
<imgsrc="logo.svg"alt="Alpha Particle's Logo">
Code language:HTML, XML(xml)
However, one of the best things about SVGs is because they are just code, you can use Javascript and CSS to make them interactive. For example, if you wanted to change the color of some of the pieces of the SVG image when the user hovers over them, you could define that behavior with CSS.
.svg-hover:hoverpath {
color: blue;
}
Code language:CSS(css)
This would turn any of the parts of the SVG matching the selector blue when you were hovering over any SVG that had that class. You could then apply CSS transitions or anything else that you can accomplish with CSS to augment the effect.
There’s just one problem.
If you embed your SVG in an image tag like the example above, you can’t target elements inside the SVG with CSS or Javascript. So how do you get SVG images that are part of your WordPress theme included in your templates while still being able to use CSS and JS on them?
The Not-So-Elegant Solution – Copy/Paste
The most straightforward but not so elegant solution is to simply copy and paste the markup from the SVG file into your template directly. This includes everything from the opening <svg> tag all the way to the closing </svg> tag.
While this is the most direct approach, if the contents of the SVG ever gets updated, you’ll have to do this copy/paste again, which makes it a bit less practical, especially for projects that are still changing and evolving.
The (More) Elegant Solution – Treat SVGs as template parts
WordPress templates can import other PHP files as “template parts” and, through this process, include all the markup of the template part in the broader template. We can take advantage of this fact to keep our SVGs as separate files while still being able to use our CSS and Javascript tricks on them.
First, wherever your SVGs live (in our example, we’ll pretend they live in an svgs folder in our theme), you’ll need to rename them to add a .php suffix. For example, if we had a file called logo.svg, we would rename it to logo.svg.php. Your file manager (Finder, Windows Explorer, etc) may let you know that you should only change the file extension if you really know what you’re doing and in this case, you definitely do.
Once your SVGs are renamed, you can go back into the template where you want to include them and use the get_template_part function, making sure to pass it the file path to your renamed SVG. In our example, that would look something like this:
<?php get_template_part( 'svgs/logo.svg' ); ?>
Code language:HTML, XML(xml)
And with that, the SVG markup will be brought into your template just as easily as including it via an image tag, except that you’ll be able to apply CSS and Javascript to make it even more powerful!
Laravel Sail is a great all in one development environment that allows developers to spin up Laravel applications quickly and easily using Docker. However, after picking up a recent project that I hadn’t worked on for a couple months I encountered a strange error:
It seemed Laravel was complaining about now being able to find the MySQL driver needed to access the database, which was weird since this project had been running previously.
A couple Stack Overflow searches led me to an answer that recommended running composer update and composer require doctrine/dbal to no effect.
However, some of the other answers I found led me to believe that the extension in PHP itself might be the problem. Because Sail uses Docker, the default answer of modifying php.ini doesn’t work in this case. This is where Sail’s publish option comes in handy.
Sail:publish to the rescue
Like many other Laravel packages and services, Sail comes with a publish subcommand, which exposes Sail’s configuration files.
After running this command, the Dockerfiles and other configuration files used by Laravel Sail will be placed within a /docker directory in your application’s root directory.
This means we can navigate to the root directory of our project, into the /docker directory and then find the PHP version that we’re currently using (for me it was 8.1) and navigate into that directory. Inside that directory you should find a file called php.ini and adding extension = pdo_mysql.so to this file will make a change to the php.ini file inside the Docker image. However, that change does not happen automatically.
Rebuilding your Sail Docker images
Now that we’ve updated the Dockerfiles that power the Sail images, we need to rebuild them for our changes to take effect. With Sail not currently running, you can run sail build --no-cache. After you come back from getting a cup of coffee, your Docker images will be rebuilt and you can start Sail with a working database connection!
In this post we’ll go over how to build a Bootstrap accordion as a WordPress block using Advanced Custom Fields. This is a useful approach for rapidly building WordPress blocks. It’s also a great stopgap for developers who are still learning JavaScript, since it doesn’t require you to write any JavaScript.
This tutorial assumes a basic understanding of how WordPress themes are structured. In particular, you should be familiar with what functions.php is in the context of a theme, the basics of how to use action hooks, and how templates work in WordPress Themes. If you’ve worked with child themes before or built a WordPress theme, you’ll likely be familiar with functions used in this tutorial. If you haven’t, we’ll cover how to set up a simple child theme.
Additionally, having a basic understanding of Bootstrap (what it is, why it’s useful as a ‘shortcut’) will help. While we won’t use the Bootstrap grid, we will be implementing a version of the Bootstrap collapse component as well as the Bootstrap card component. You don’t need to have used these before to follow along, especially if you’ve used other Bootstrap components before.
Getting Started
To follow along, you’ll need a simple WordPress website that you can hack on. For simplicity, we’ll work inside a child theme. We’ll extend TwentyTwenty, a default theme which comes with every WordPress installation, though any theme will do. If you’re building just for yourself, this is adequate. If you’re building blocks you want to distribute, it’s better to keep them in a plugin. That way, switching themes won’t remove content from posts and pages.
Create your child theme
Begin by creating a new directory in the themes directory. The best practice would be to name it twentytwenty-child, but you can pick whatever name you’d like. Inside this directory, create a style.css file and add the following header:
The most important part is to specify the template, which tells WordPress which theme is this one’s parent. You can add additional information, such as the theme version or a description, to your header as documented in the developer handbook. For reference, here’s the header from mine:
/*
Theme Name: Accordion Tutorial
Description: Twenty Twenty child theme for demoing a Bootstrap accordion block.
Author: Jack Lowrie
Author URI: https://github.com/jacklowrie
Template: twentytwenty
Version: 1.0.0
License: GNU General Public License v2 or later
License URI: http://www.gnu.org/licenses/gpl-2.0.html
*/
Code language:PHP(php)
Then, create a functions.php file, and add the following to it:
This enqueues TwentyTwenty’s styles before ours, that way the changes we make will extend TwentyTwenty rather than replace them. And that’s it for now! You have a child theme ready to hack on.
Enqueue Bootstrap
Of course, we can’t build anything with Bootstrap without enqueueing it! To keep it simple, we’ll load it in from Bootstrap’s CDN. add the following to your theme’s functions.php file:
This code ensures that Bootstrap (and it’s dependencies) will load on your site.
Install Advanced Custom Fields Pro (ACF)
You’ll also need to have the Advanced Custom Fields plugin installed. While the core plugin is free and available in the WordPress Plugin Directory, it doesn’t give you all the capabilities and field types available with a Pro license. This tutorial makes use of the repeater field and the block-level field group, both of which require a pro license. ACF Pro is potent, and is worth the investment. Even if you don’t need to build custom blocks, you may find yourself reaching for it on more WordPress projects than not.
Registering your first block
Once you have a WordPress site (with Bootstrap styles and scripts enqueued and ACF Pro activated), you’re ready to start building blocks. The bird’s eye view for this is to create a template file for your block, then register it using ACF’s block registration function to ensure that the block is only registered if ACF is present on the site.
It’s helpful to keep all block templates in a folder to stay organized. Where you keep it is up to you, especially if you’re doing this in a theme and not a plugin — it may make sense to keep it as a top-level folder in the theme or to place it inside of a templates or template-parts folder if your theme has one. We’ll keep ours top-level for now. Create a new blocks folder in the root of your theme, then create a new template file called accordion.php inside. We don’t need to add anything to this file yet. It only needs to exist.
Then, we need to register that file (in functions.php, just like we enqueued Bootstrap).
This is actually all there is to registering a block. If you add a block to a post or page now, the accordion will show up as an option. If you use it, any markup inside that template file will show up in the corresponding spot on the post or page. In fact, let’s do that! We can add the accordion example from the bootstrap collapse docs to a page as proof that we have a movable, renderable block (this is also an easy way to verify that we enqueued Bootstrap correctly).
Now, this isn’t a terribly useful block (it’s entirely uneditable, and we’re dependent on ACF to register the block even though we haven’t made any custom fields). But let’s not downplay the accomplishment!
FWIW, ACF’s register block function at its core is a php wrapper for WordPress’s Javascript function RegisterBlockType(), which is how we’d register the block if we didn’t use ACF. We are avoiding that since this post is about building blocks without Javascript.
Setting up a field group
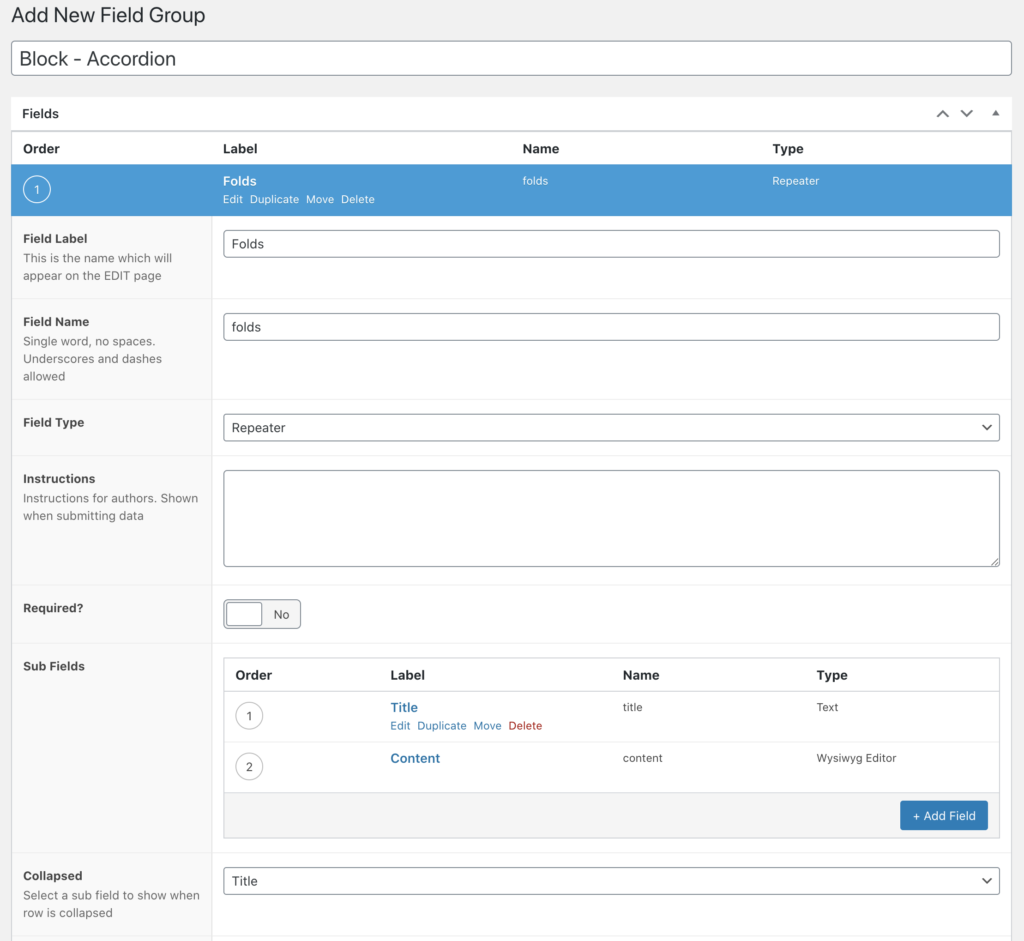
Now that we have a block template, we need to set up fields to render in that block. We can set field groups to display only on specific blocks! From the Custom Fields menu in the WordPress Dashboard, add a new field group and call it Block - Accordion. It’s nice to keep all the field groups for blocks together in the list, though this is up to personal preference. Then add a location rule: “show this field group if blockis equal toAccordion.
An accordion is a perfect candidate for a repeater field in ACF. Each new row in the repeater will correspond to a new ‘fold’ in the accordion, and all the folds will have the same subfields and layout.
So, add a repeater field and call it ‘folds’, then for simplicity of this demo, add a text field called ‘title’ and a WYSIWYG subfield called ‘content’. Now, if we add our accordion block to any page, we’ll be able to add as few or as many folds to the accordion as we’d like, and the content of each fold is customizable with a WYSIWYG editor!
We can save this data, and it will persist on the individual instance of the block, though we still need to render it in the template.
Rendering field content in the block template
Now, we can start to render each fold in the template. Each .card element in the example code we pasted in earlier makes up one fold. So first, let’s remove all but one ‘fold’, by deleting all the divs after the first card, taking care not to remove the closing tag for the accordion, and also remove all the placeholder content:
This is our fold template, which we can fill with the content from our block’s custom fields. Now, we can iterate over all the folds from the repeater and render them as a new .card. To do this, we’ll use two ACF functions, have_rows() and the_row(). These are used almost identically to have_posts() and the_post(), so if you’ve ever seen a WordPress loop, this might be a familiar pattern! Wrap our fold template in a while loop, then grab the fold content using get_sub_field():
Our accordion is almost good to go! If we look at this on a page now, we’d see each fold we added to the block rendered, but the accordion wouldn’t behave the way we want. This is because the Bootstrap accordion counts on each fold having a unique id. In our code, every fold has an id of collapseOne. We can follow a similar convention using ACF’s get_row_index() function, which will tell us which iteration of the while loop we’re currently in (by telling us which row we’re currently rendering). We can also update the aria labels at the same time:
Now, our accordion works! The last thing to do, since this is now a fully-functioning accordion and not just an example, is to update the id of the accordion (and the data-parent attribute of each fold) from #accordionExample to #accordion. Not technically necessary, but names matter!
That’s it!
We now have a fully functional accordion block. We can use this as a template to make other Bootstrap components as well, including Jumbotrons, Media Objects, List Groups, and more.
You can use the code from this tutorial as a template for creating other Bootstrap blocks for practice or to fit your needs. See the full code in my github repo: jacklowrie/wp-accordion-tutorial.
We’ve been working on a large WPML implementation lately with quite a few translated pieces of content. If you haven’t used WPML before, you might not know that changing the contents of a page that’s already been translated marks the other translations as out of date. This means WPML wants you to update them to reflect the content changes you made on the English page.
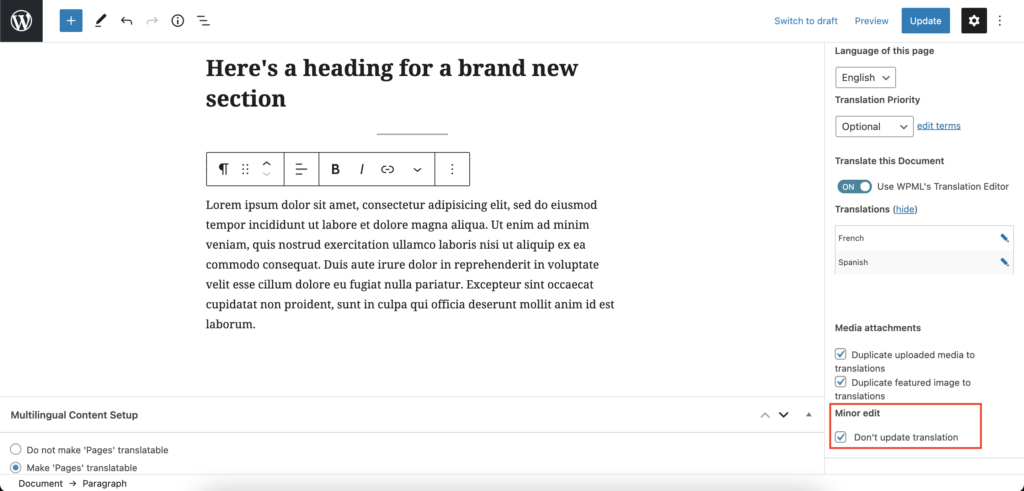
However, there are sometimes when the changes you’re making on the English page do not require re-translating the other pages. This is why WPML implements a button hidden all the way down in the right hand sidebar of the block editor under a heading of Minor edit that says, “Don’t update translation”. If this box is checked, any changes you make on the page you’re currently editing won’t affect the other translated version of that particular page.
The minor edit checkbox as it appears in the Block Editor
One you get all the translations in and a site gets up and running, it’s often the case that the edits you’re making to each page will be relatively minor and forgetting to check this box can cost you a lot of time when you have to retranslate pages that may not have required it in the first place. While we were searching for a solution, we found manyposts on the WPML support forums asking for a way to have this box checked off by default, but the WPML support team referred each of these customers to their contractors to get a custom solution built. So we built a custom solution of our own.
Because this code only makes sense to run in the admin area (as it only affects the editor and nothing on the front end of the site), it should be enqueued using the admin_enqueue_scripts hook.
Once you have the file enqueued and loading in the admin area, you need to fill it with the code to check off the “Minor edit – Don’t update translation” box.
// Wait until the page is loaded so that the markup we are targeting existsdocument.addEventListener("DOMContentLoaded", () => {
// Look for the WPML checkbox that we are trying to targetconst minorChangeBox = document.querySelector('#icl_minor_change_box input[type="checkbox"');
// If the checkbox exists on the particular page we're on...if (minorChangeBox) {
// ...click it, causing it to be checked off
minorChangeBox.click();
}
});
Code language:JavaScript(javascript)
And that’s it! Now when you load your content in the block editor, you should see that the “Minor edit – Don’t update translation” is checked by default. Of course, if you make an edit that does require updating a translation, you should uncheck this box. But once you are in a position where updates to your site are mostly minor, this can come in handy!
How can we help?
Do you feel like you’re fighting against your WordPress site and could benefit from workflow improvements like this? Reach out either by using the contact form below or sending an email to hello@alphaparticle.com and let’s talk about how we can get your software to work for you, not the other way around!
Alpha Particle is expanding and looking for a WordPress Developer who can tackle some of our production WordPress work. This means building custom themes (either completely from scratch or Child Themes) as well as plugins to fit our client’s needs.
You’ll be working directly under our CTO. This position is focused on helping you grow as a developer while shipping code that goes directly into the hands of our clients, or in most cases, straight onto the web.
The ideal candidate is in the Chicago area, but remote candidates are welcome. The entire team is currently working remotely, but will be looking to find office space again when it’s safe to do so. Most of our work happens on Slack, Trello, and Github.
This is a contract position, but ideally you’d have at least 10 hours per week of availability. We will work with you well in advance to determine scheduling of various projects as they come in.
Here’s what we’re looking for:
Familiarity with the WordPress ecosystem: You know how themes are constructed, how WordPress deals with templates, how child themes work, and how plugins work.
HTML/CSS/JS proficiency: We need you to know the basics of how a webpage is put together.
SASS/CSS3: We use SASS or CSS3 for all of our styling. This also typically means you’ll need to know a build tool. We use Gulp or Webpack depending on the project. While we don’t expect you to know how to configure these yourself, hopefully you have experience using build tooling that’s already set up.
Git: Everything we do is version controlled and this is also tied into how we handle deployments, so it’s important that you’re comfortable using Git.
Have built something custom in WordPress before: You’ve built either a theme or a plugin or something that is more than just activating code that someone else wrote or tweaking settings in wp-admin.
Nice to have:
PHP proficiency: It would be nice if you were comfortable with functions.php and how to do things on the server side.
Experience using WordPress hooks/filters: Sometimes we don’t get to do everything completely custom, so if you could use hooks and filters to modify existing functionality, that would be great.
Experience tuning WordPress performance: Things like what sorts of DB queries to avoid, when caching is appropriate, etc.
If this sounds like you, send us a note to hello@alphaparticle.com with the subject line WordPress Developer Job and tell us why you think you’d be a good fit. Please include your resume and/or a link to your personal site along with your hourly rate.
WordPress is a fantastic way to start learning to code. You rarely need to learn more than one new thing at a time in order to get building, and you can always find one new skill to learn (or improve) with each new project.
But all that changed when the fire nation attacked the block editor was introduced. Gutenberg raised the barrier to entry for programming with WordPress, and created a sizable speedbump for faithful WordPress developers that had never needed JavaScript before.
This doesn’t have to kill momentum, or stop new developers from using WordPress as their ‘way in.’ There’s a workaround for building custom blocks that requires minimal JavaScript. It isn’t necessarily a long term solution (though you can build very polished websites with it). But it is an effective stopgap to keep (or start) building websites while developing the skills necessary to start building native WordPress blocks.
Using WordPress as a ladder for improvement
Looking at WordPress as a framework, it’s easy to see the appeal of using it to learn web development. It’s extremely well-documented, surrounded by an active and supportive community, and written in a way that allows you to ‘wade in’ slowly to the code without any prior knowledge. Before Gutenberg, a new developer’s journey with WordPress might look something like this:
You can grow with a ‘learn one new thing per project’ strategy for your entire career without leaving the WordPress ecosystem.
After exploring how WordPress works as a CMS by configuring sites without code, they can slowly start introducing their own code. They can graduate from building sites using drag & drop themes/plugins to adding custom CSS rules via the customizer as they start to learn CSS.
From there, our new dev can learn about child themes and create their first stylesheet for more comprehensive style rules. Then, they can learn about WordPress’s template hierarchy and custom templates. As they do, they can dip into as much or as little HTML and PHP as they’re comfortable with, leaning on the framework as much as they need.
As their skills grow, they can begin building their own themes, and start adding custom functionality in `functions.php`. Once they can modify WordPress behavior in `functions.php`, it’s easy to start developing plugins: First, by moving that custom functionality from their theme into simple custom plugins to understand how plugins are structured, then by building larger more complex plugins, some of which can modify or expand WordPress’s core features.
At this point, our ‘new’ dev can drop the adjective. They have enough experience reading and writing code to make learning a language for a different framework easier. Their proficiency in HTML/CSS and PHP is also strong enough to experiment with lighter PHP frameworks like Laravel or Symfony. It also makes it possible to start learning more about routing and interacting with the database (which WordPress normally handles for us) – or – they can continue learning about routing and APIs etc by extending those features in WordPress via the WordPress REST API.
Because WordPress handles so much out of the box, you can isolate one language, grammar, skill or topic to learn or improve on at a time – whether that’s language-specific, or a higher-level concept, you rarely need to learn more than one new thing at a time in order to get building. You can grow with a ‘learn one new thing per project’ strategy for your entire career without leaving the WordPress ecosystem.
The challenge with Gutenberg
In the hypothetical roadmap above (it’s not so hypothetical, I’m on it 🙂 ), there’s one now-ubiquitous language that’s noticeably absent: JavaScript. Before WordPress 5.0, JavaScript was a nice-but-optional language for WordPress developers. You could go a long way on writing or modifying only a few lines of JavaScript per project, if you did so at all. You certainly didn’t need a build process or NPM to get by.
Gutenberg raised the barrier to entry for programming with WordPress, and created a sizable speedbump for faithful WordPress developers that had never needed JavaScript before.
However, when Gutenberg replaced the Classic Editor, developers had to worry about rendering content both in the template and in the editor via React components. Content is still stored the same way in the database, but instead of knowing exactly where and in what order content is rendered, developers suddenly needed to worry about content appearing in any order. Crucially, they also needed to render them appropriately both on the frontend and in the editor.
If you’ve played with the WordPress block editor, you can consider the jump from Classic to Gutenberg by looking at the Classic Editor as a single unrendered block. Instead of having one ‘block’ being rendered only on the frontend with the Classic Editor, Gutenberg allowed multiple blocks to be rendered in any order, even nested, both on the front end and in the editor. There’s even a block that mimics the Classic Editor, to make it full circle.
Furthermore, if you do need to make more involved blocks, or if you want to modify the built-in editor experience at all, then all of a sudden, you’d need HTML/CSS, some PHP, JavaScript, and to be familiar with how WordPress is structured as a framework, including how its REST API works!
ACF as a Stopgap
If you weren’t sold on the Advanced Custom Fields (ACF) plugin before, it really shines in the transition period between the Classic Editor and Gutenberg. Before Gutenberg, ACF was used to augment the Classic Editor, and let WordPress content creators manage content on more robust pages. While the free version was exceptionally powerful, the pro license was generally considered to be one of the best (and even most necessary) investments for a serious WordPress site.
Building blocks using the ACF plugin allows newer developers to sidestep using JavaScript, and continue building sites learning one thing at a time. This method is also particularly useful for WordPress developers used to building sites and admin interfaces ‘the old way’ with just PHP/HTML/CSS, who haven’t had the chance yet to learn JavaScript, deeply™. There simply is no better way to make a Gutenberg block without JavaScript.
Limitations to using ACF
The most obvious drawbacks are:
It introduces a dependency in every project
That dependency isn’t free
To use ACF with Gutenberg blocks, you need a pro license, making it harder to get away with the free version post WordPress 5.0. If you’ve been building WordPress sites with the Classic Editor and ACF pro previously, neither of these are significant changes. Furthermore, given this is a pretty major shortcut to building custom blocks, the return on investment for the pro license is substantial – even more so than it was before.
Additionally, this method also fails to take full advantage of Gutenberg, and arguably offers a worse editor experience, since the ACF UI remains largely unchanged. Though this is less attractive for brand new builds, it can be an advantage when updating a site that already uses ACF to use Gutenberg, since content creators are already familiar with that editing experience and can transition more easily.
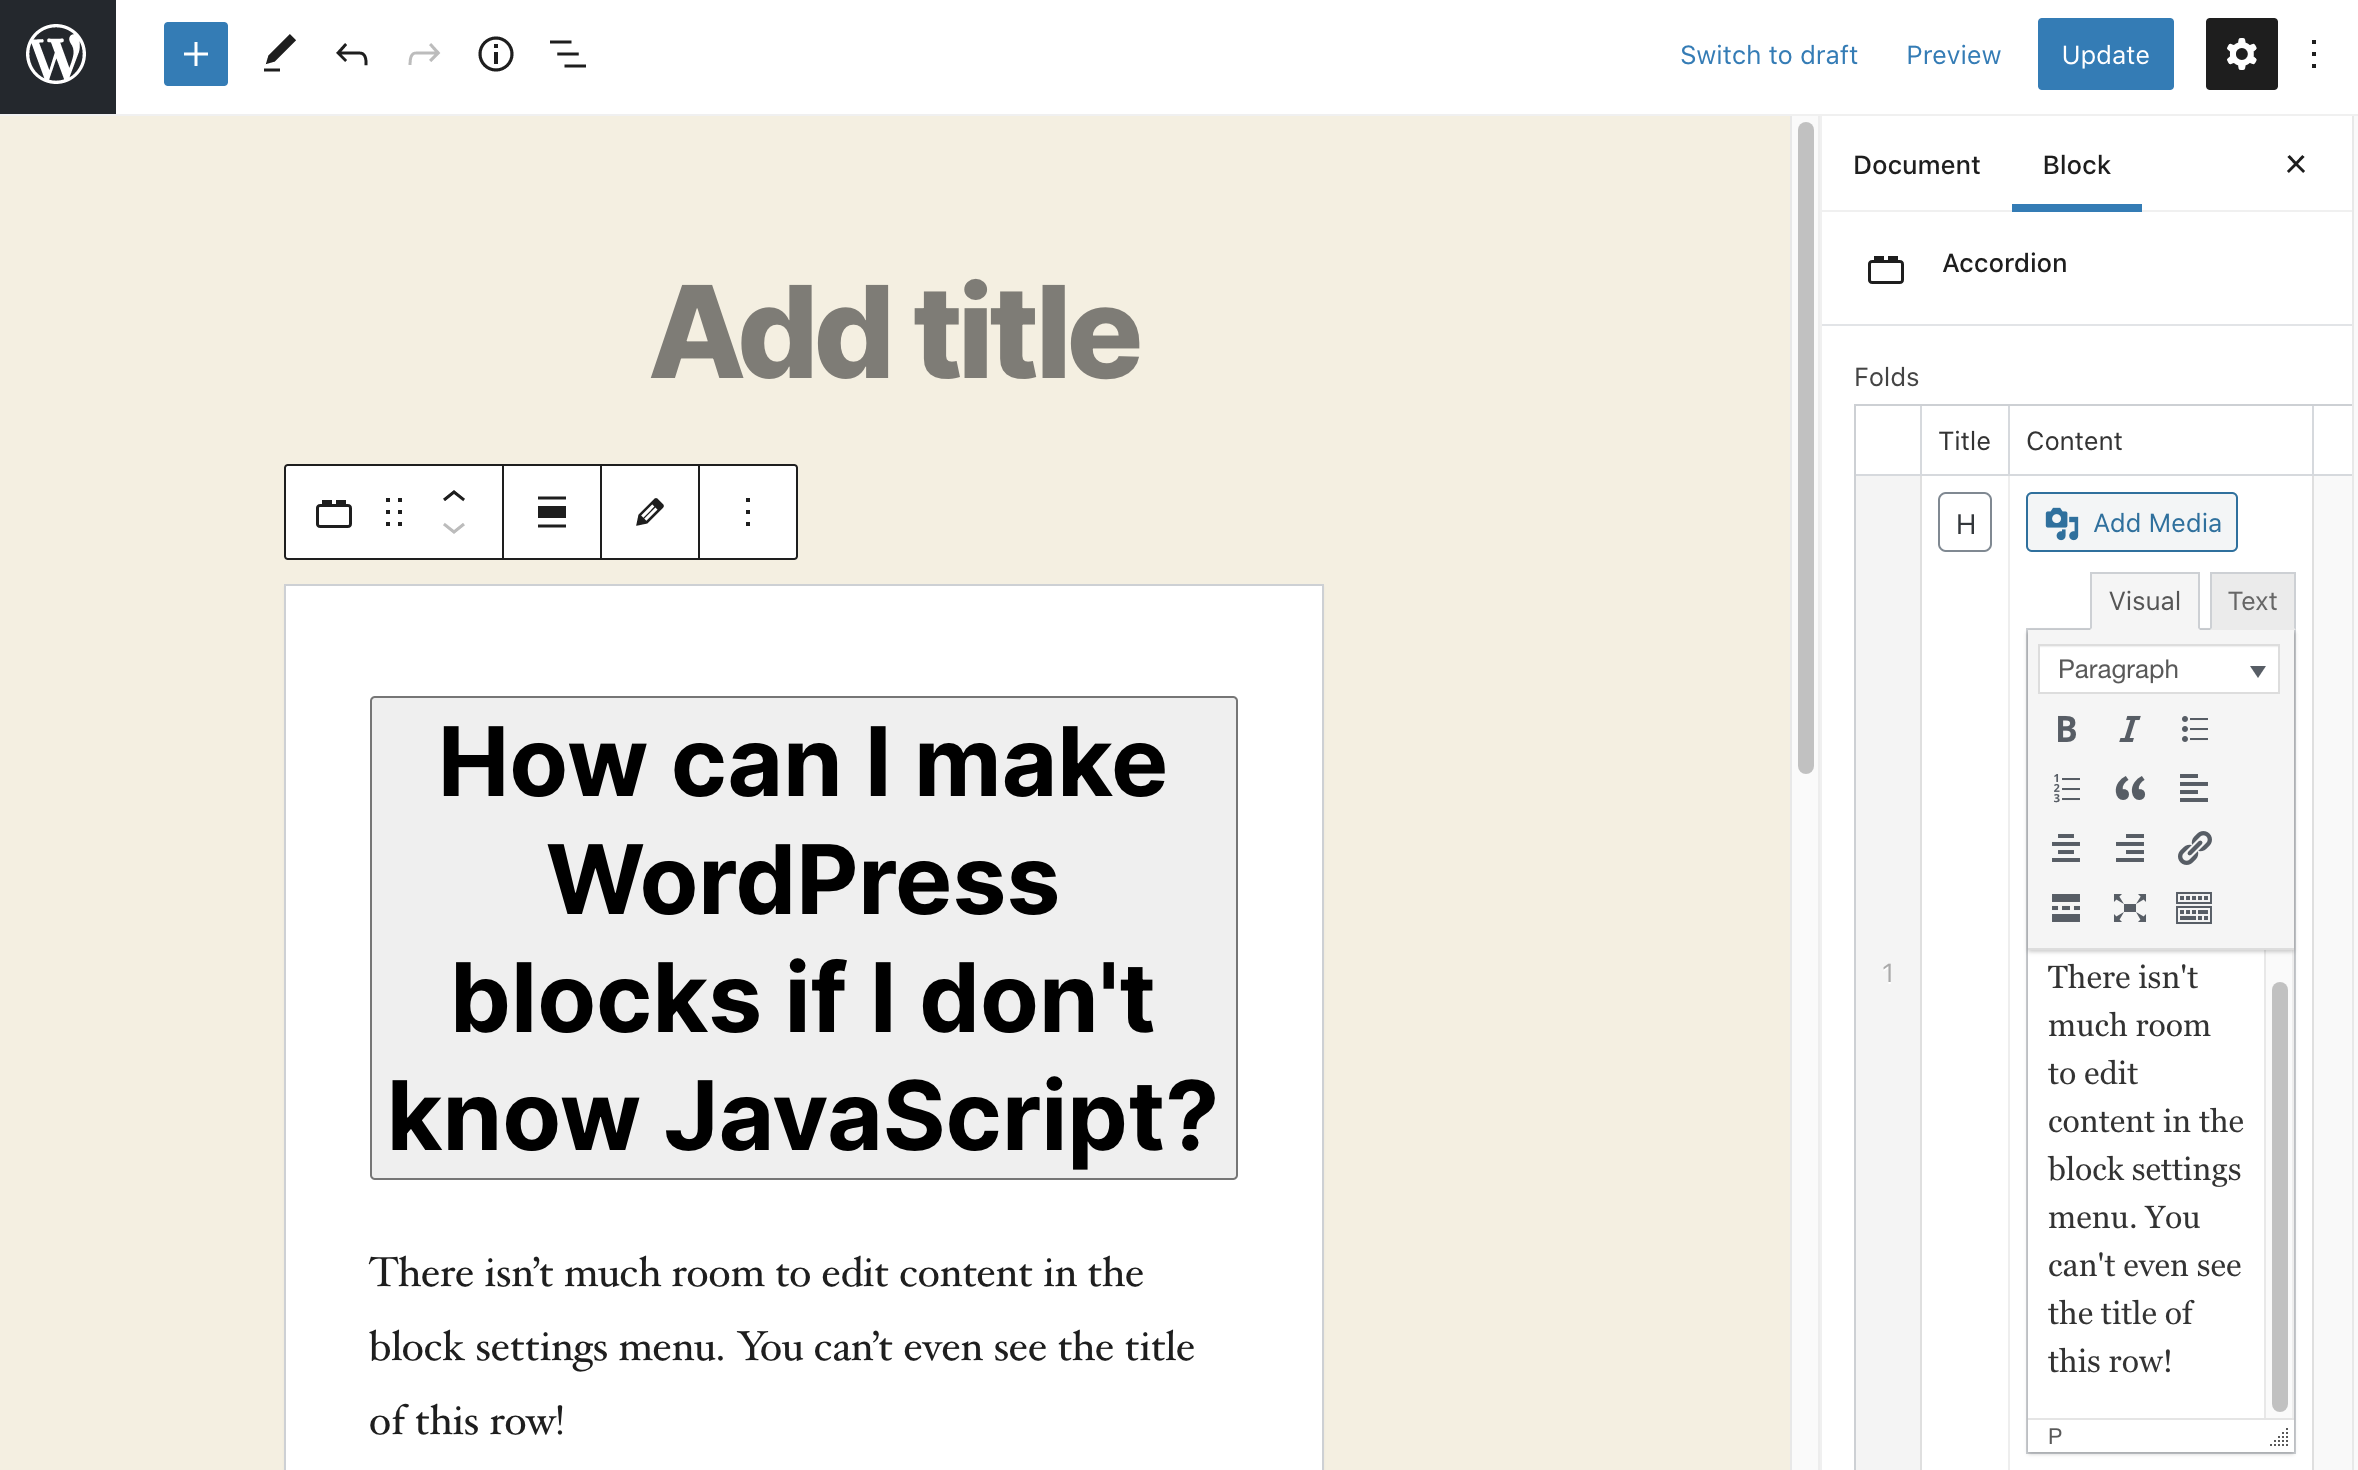
Repeater fields don’t fit in the block settings sidebar.
Perhaps the biggest limitation of using ACF to build custom blocks is, instead of editing content directly as-styled like a native block, you make edits in an input field on the side menu and watch the change happen in real-time in the rendered preview block. For simple or small fields, this is almost as good as editing the preview directly. If you’re using more complex ACF fields like repeaters or field groups, then cramming those fields into the side menu doesn’t quite work.
ACF solves this by letting you edit blocks by ‘flipping’ them over to expose the ACF editor. When doing this, you can’t see how those changes would be rendered in real time (you’d have to keep flipping the block over to make tweaks).
Flipping ACF Blocks gives you more room to edit content.
This in no way limits the ability to create polished, high quality websites; the published page looks the same either way. However, having native blocks that can be edited directly sandwiched between ACF blocks that can only be edited in the side menu (or flipped) creates a clunky editor experience. This might seem a small concession given the benefits, however it still underscores using ACF to circumvent JavaScript as a temporary measure on the way towards full Gutenberg adoption.
Will ACF drive mass developer adoption of the Block Editor?
JavaScript becoming a core part of the WordPress stack threw a wrench in things for a lot of established WordPress developers and made WordPress a little less accessible for new developers. Using ACF to build custom blocks can counteract that for a little while, buying time for working WordPress devs to learn JavaScript. Ultimately, embracing JavaScript is a good thing. Its rate of adoption has made it too big to fail, and it is the future of the web – at a minimum, it’s the intended future of WordPress. But until we can download languages instantly and directly into our brains, this is a very effective stopgap.
Ready to start building WordPress Blocks without JavaScript? Check out our tutorial on building a Bootstrap accordion block with ACF:
Deployment is the stage of the software development life cycle most likely to cause problems. Even if your deployment pipeline is perfectly set up, it’s the stage of the development process where any bugs you didn’t catch while building or during QA get shipped out to your end users. This might mean you need to roll back, or at the very least track down the problematic deploy at some point in the future.
Most modern deployment tools handle this by making deployments both automatic and repeatable, meaning that you can deploy with confidence and roll back when necessary (If your deployment processes aren’t like this right now, look for another post coming from us very soon!). However some of your clients may still depend on hosting infrastructure that requires deploying via FTP, which is much harder to automate and very difficult to roll back if needed.
Luckily, even if you are forced to use FTP as a deployment mechanism, GitHub Actions can help make this both an automatic and repeatable process to make deploys go much more smoothly. Let’s take a look at how this works.
Introducing GitHub Actions
GitHub Actions launched recently to make it “easy to automate all your software workflows”, which is exactly what we’re trying to do here. As long as your code is hosted in a GitHub repository, you can use GitHub Actions. Actions are YAML files called workflows that fire in response to certain events around a repository, such as a push to a particular branch, a pull request being merged, or a release being tagged. Actions are commonly used for running tests against pull requests to ensure they’re ready to be merged, or to run the build tooling for a particular codebase.
However, you’re not limited to these common use cases. There are pre-built GitHub actions to help you with most anything you can think of. In our example, we’ll put a couple of these pre-built actions together to create an automatic and repeatable FTP deployment pipeline.
What are we trying to do?
In our specific example, we had to run a couple build steps to generate the correct built files in our WordPress theme, and then deploy that built theme via FTP to either staging or production, based on whether the changes we had made since the last deploy were ready to be reviewed by our client or ready to be reviewed by the world.
We will differentiate between these two by creating two different workflow files: one for staging and one for production. We will trigger the staging workflow anytime code is pushed to the master branch (or a PR is merged to master) and we will trigger the production workflow by tagging a release. It’s much harder to tag a release accidentally than it is to accidentally push to master, so this makes sure that changes don’t go out to production until we’re absolutely sure they’re ready.
Setting up GitHub Actions
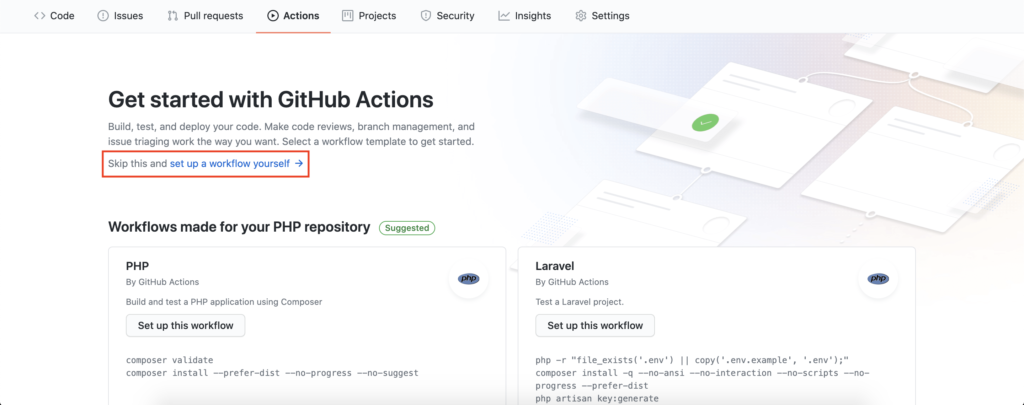
If you haven’t created any Actions in your repository yet, the easiest way to get started is to click on the Actions tab in the repository and you’ll be presented with the GitHub Actions splash screen. GitHub will suggest a couple common actions based on the language it detects your repository uses primarily, but since we’re doing something just a bit out of the box, click on Skip this and set up a workflow yourself.
Once you click on that, you’ll be taken into the main GitHub Actions interface where you can start to edit the YAML file that will make up your first workflow. To keep our workflows separate, we’ll name our first one staging.yml just so we can keep track of where we’re deploying. To make sure we don’t lose our work, go ahead and commit this initial file by clicking on the big green Start commit button in the top right corner.
Now that you’ve got a workflow committed, if you have the repository cloned down locally, you can edit this workflow inside your favorite text editor by navigating to the .github/workflows directory that’s inside the repository root. If you’d rather keep editing inside the GitHub GUI, that’s fine too.
Creating our first Action
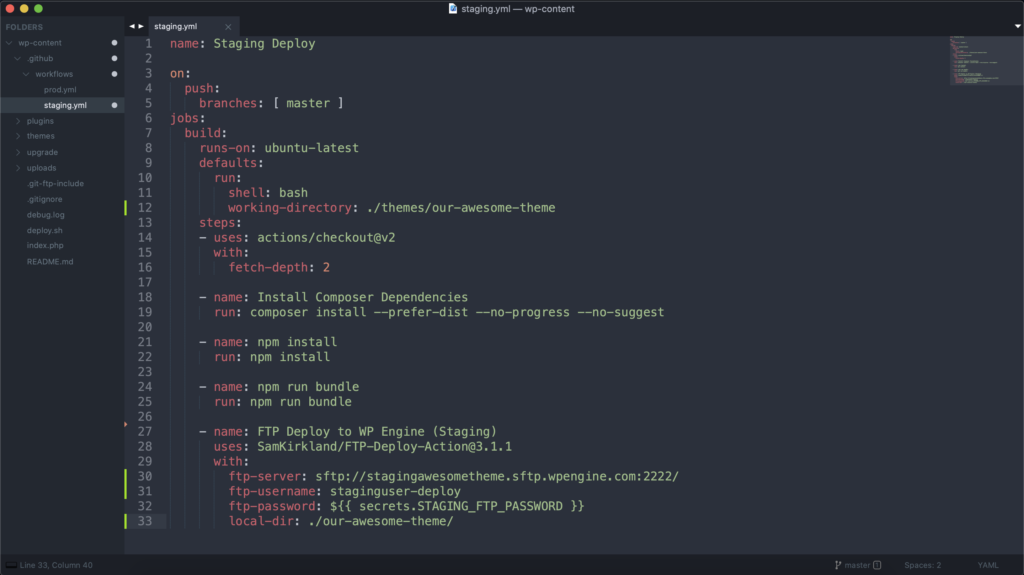
Now that we have our staging.yml file set up, let’s clear it out so we can start filling it with our own workflow steps. Keep in mind that because this is YAML, spacing and indentation matters, so if you start getting any weird errors, check to make sure that you’re either using tabs or spaces (we’re not going to start that flamewar here) across the entire file and that everything is indented correctly. Let’s break the pieces of this workflow file down step by step.
First we want to give our workflow a name. Anything is fine, but something like Staging Deploy probably makes the most sense. This is important so that if you see that a workflow has failed, you can easily know whether it was a staging deployment or a production deployment. After that, we need to tell GitHub when it should trigger our workflow. In this case, we want our staging deployment to trigger any time new code is pushed to master.
name: Staging Deploy
on:
push:
branches: [ master ]
Code language:HTTP(http)
Side note: Any pull requests merged to master technically count as code getting pushed to master, so this workflow will also trigger whenever a pull request is merged to the master branch.
Next, we need to give our Action some information about the environment we want it to run in and any other default variables we want it to use. We default to using ubuntu-latest for the runtime environment and bash as the default shell. These defaults work well for most workflows and should only really be changed if you know what you’re doing. In addition to those, we will set the working-directory variable so that we don’t have to specify this directory on each step of our workflow.
Side note: Workflow steps run in the root of the repo by default.We only specify our working directory because the root of our GitHub repo is not where we want our action to run.
Adding some Workflow steps
Now that we’ve got our workflow configured and the workflow environment specified, we can start adding steps. The first step we’re going to take is to checkout the actual git repo into the environment we just set up inside the Action. We can use a pre-built Action for this. That’s what actions/checkout@v2 is specifying here.
After that, we can continue adding steps. If our steps are just shell commands, they can be relatively simple. They need a name and then the command to be run.
Now that our ready-built theme has been generated, the last step is to actually run the FTP deploy. If you’re not well-versed in running an FTP deploy in an environment like this (and don’t worry, neither am I), this is where we again leverage a pre-built Action to help us. In our case, we used SamKirkland’s FTP-Deploy-Action. To use this Action, we have to specify it in the workflow file and provide it with all the necessary parameters. You can read more about specific parameters that might apply to your use case in the linked documentation, but here’s how it looked for us.
Looks great, right? You might notice that we don’t include our ftp-password in this workflow file. Because these files are committed directly to the repo and storing credentials or other sensitive information in version control is never a good idea, we have to use another GitHub tool called Secrets.
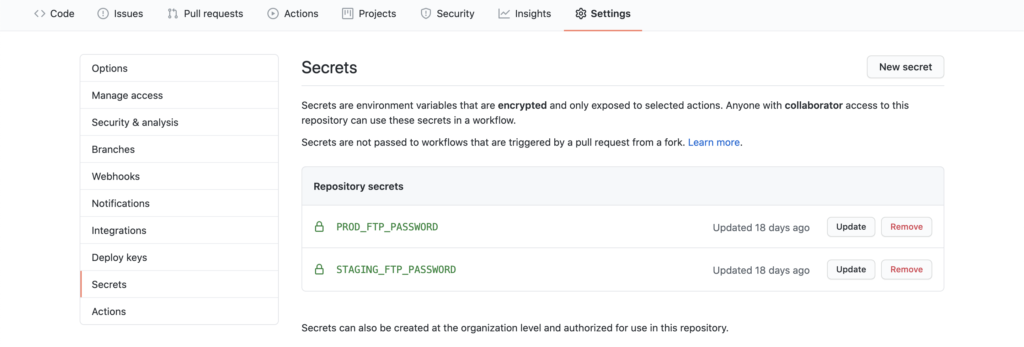
Using Secrets to keep credentials, well…secret
If you click on the Settings tab on your GitHub repo, you’ll see a few different options in the left hand navigation, one of which is Secrets.
By clicking on Add Secret you can specify a name for the secret (PROD_FTP_PASSWORD or STAGING_FTP_PASSWORD in our screenshot above) and then actually paste in your password, which GitHub will store securely. As you can see from the interface above, after that, the password is not accessible. It can be updated or removed, but not accessed.
Now that we have our credentials securely stored you can reference them in your workflow file using the format ${{secrets.STAGING_FTP_PASSWORD}}, substituting STAGING_FTP_PASSWORD for whatever you named your secret. If you have even more strict security restrictions, your FTP URL and FTP Username could be stored in Secrets and referenced in the same way as well.
Testing our Staging Deployment Workflow
Now that we have our workflow set up (make sure it’s committed!), it’s time to test. Since we configured this workflow to fire on a push to the master branch, that’s what we need to do to test that everything is working as expected. An easy change to test is to push an HTML comment in a particular place where you know it will get output on the frontend of your staging site.
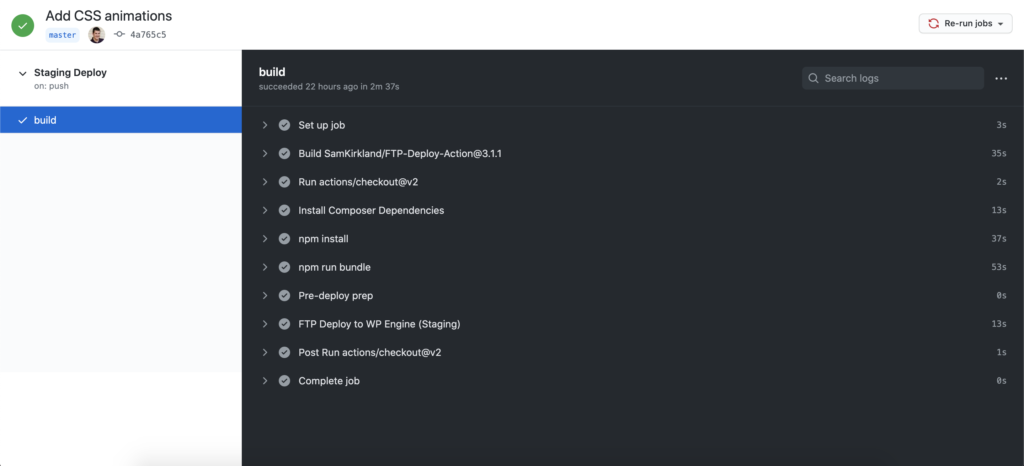
Once you do that, you can go over to the Actions tab in your repo and see your first Action running. If you click into the Action itself, you will be able to see each of the individual steps running and whether they passed or failed. Once all the steps have passed, you should see the elusive green checkmark.
Then it’s time to head over to your staging site and check whether you see the HTML comment you inserted into the source code to test your deployment pipeline.
Congratulations! You’ve just created your first workflow and you’ll never have to hear the question “Is that change deployed to staging?” ever again! Anyone with the proper permissions can go into the Actions tab and see when a particular commit triggered a run of the workflow (staging deploy).
Creating the Production Deployment Action
To create our Production Deployment workflow, copy our staging.yml file into a file in the same directory called production.yml. Our production deployment action will be the exact same as our Staging Deployment action with three notable exceptions.
First, we want to change the name at the very top of the workflow from Staging Deployment to Production Deployment. This ensures that when we’re looking at runs of the workflow inside the GitHub Actions interface, we’ll be able to tell them apart.
Second, we want to change the conditions on which this workflow triggers. Instead of triggering on a push to the master branch like our staging workflow, we only want to trigger this workflow when someone tags a release. This means we need to modify the top part of our workflow as follows:
name: Production Deploy
on:
release:
types: [published]
Code language:HTTP(http)
Finally, our FTP credentials will be different. If you used Secrets to keep your credentials secure (please tell me you did), you need to add your production credentials to Secrets as well and then update them within the workflow file itself. This means that our FTP step will look something like this:
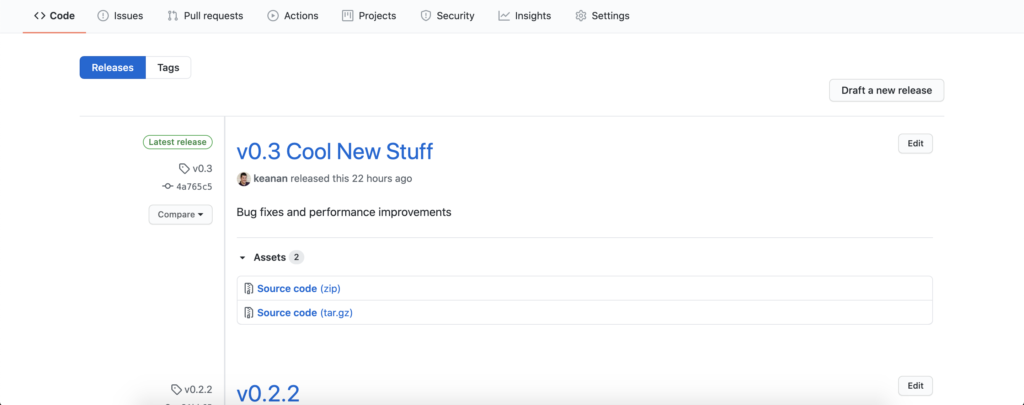
Since we still have our test HTML comment committed from testing our Staging Deployment workflow, we can test this relatively easily. Once the new Production Deployment workflow is committed, you can go to the Releases area of your repo and click on Draft a new release. Filling out the necessary fields will tag a new release and once that’s completed you should see that your new workflow has been triggered under the Actions tab of your repo.
Once all the steps have passed, you should see the elusive green checkmark. Then it’s time to head over to your production site and check whether you see the HTML comment you inserted into the source code to test your deployment pipeline.
If so, you’ve now got a fully automated, multi-environment deployment pipeline. Your DevOps certification on LinkedIn won’t be far away!
Wrapping Up
Even when you have to deploy over FTP, that doesn’t mean you can’t have automated, repeatable deploys. Setting up a deployment pipeline like this helps use modern development practices like version control, testing and other automation while still fitting your workflow into your client’s infrastructure requirements. If you’re looking for even more inspiration, check out the Marketplace where you can find all the pre-built actions that people have created.
How can we help?
Looking to automate your developer workflow and make your developers more productive? Reach out to hello@alphaparticle.com or use the form below and let’s talk about how we can help.
Creating custom Gutenberg/Block Editor blocks with ACF is a great way to provide WordPress users with the functionality of custom blocks without having to be familiar with Javascript and React. If you haven’t tried this workflow before, the experience is largely similar to how ACF was used before the advent of the Block Editor. There is the extra step of having to register the block (using PHP, still no Javascript necessary!) to make sure WordPress knows you’re trying to build a new block. But after that’s done, you add custom fields to it through the same ACF interface you’re already familiar with, and build the template for controlling how the block displays with get_field and the_field calls just the same as you always have. The code to register a block looks something like this:
And with that, we’ve registered a new “Image with Text” block that will now be available inside the Block Editor. However, for adding that last extra bit of polish, let’s take a look at how we can add a custom icon to our new block.
Custom Icons in ACF Blocks
In our register block code, we can specify an icon parameter, which tells ACF that we want a custom icon. We can either specify a string for a Dashicon (an icon set included with WordPress):
However, this method means that you have to paste the hardcoded SVG string into every block you want to register with that icon. If you’re registering many blocks with the same icon, and decide that icon needs to change in the future, you have to replace that hard-coded SVG string on every block. Luckily, there’s a way to make using the same icon for multiple blocks much more efficient.
Use an SVG file instead of a hard-coded string
If there’s an SVG file in your theme that you want to use for your custom blocks, you can use file_get_contents to get the SVG code out of the file and into your register block call without hard-coding the SVG string. Here’s what that looks like:
You’ll need to update the file path to reflect where the image actually exists in your theme, but if you ever wanted to update the icon, you could do so just by updating that one SVG file and all the blocks that reference that file will now be updated as well.
Heads up!
Loading SVG code like this can potentially be a security concern (similar to why the WP Media Library doesn’t support SVGs by default) so make sure any SVGs you have included this method have been inspected to make sure they’re safe and contain only the code needed to render the image.
That’s it!
You know should be able to use your custom SVGs while keeping your register block calls nice and DRY.
Need more help?
If you’re taking on new Block Editor project or exploring how to transition your site to the new Block Editor, reach out to hello@alphaparticle.com and let’s see how we can help.
You may have heard that WordPress has a brand new block editor that completely transforms the writing and content management experience. However, there are plenty of sites that aren’t ready to move their entire base of content over to the new editor. This could be because not all of their plugins are compatible with the new editor or their editorial team isn’t ready to have a totally new editing experience.
Luckily, there is a plugin that can help you move your content gradually into the new editor: Gutenberg Ramp. This plugin hasn’t been written about a ton, so when I mentioned it in a conference talk back in 2019, there were some requests for a more in-depth demo.
If you’re more of a video person, I’ve walked through the same use cases and demos that I’ll detail in this post as a Youtube video:
Downloading and installing the plugin
Gutenberg Ramp can be downloaded and installed just like any other plugin. Either search for it in the Plugins section of wp-admin, or download the ZIP file and place it in the plugins directory of your WordPress installation. Once you’ve chosen one of these methods, go into wp-admin and activate the plugin.
Gutenberg Ramp settings
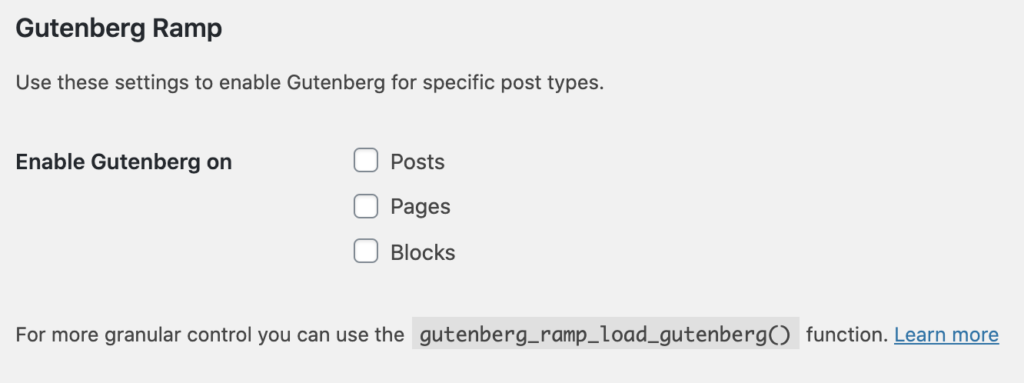
At this point, you should notice that all your content is now editable using the Classic Editor. You’ll also notice that you have a section labeled “Gutenberg Ramp” under the Settings > Writing menu and that’s where we’re going to start.
Enable for an entire post type
A popular use case for Gutenberg Ramp is to enable the new editor on pages to start to deliver a rich editing experience for those updating page content, while letting everyone else writing posts to have the same experience they’re used to. Others have a custom post type that’s published less frequently but could really benefit from blocks and want to learn the ropes of the new editor using that post type.
As we saw in the screenshot above, the Gutenberg Ramp plugin makes both these workflows very simple. Go into Settings > Writing and check the box for the post type you want to enable the new editor on. Make sure to Save Changes, and that’s it! All posts of any of the post types you checked will now use the new block editor, while leaving the rest of your content to use the Classic Editor experience.
Enable for an entire post type (using code)
Maybe (hopefully!) your codebase is under version control and you would like to keep as many of your configuration changes stored in code as possible. Gutenberg Ramp supports this workflow as well. In functions.php (or wherever you keep your modifications and additions to WordPress hooks and filters), you can use the gutenberg_ramp_load_gutenberg function to specify rules for which content is editable with the new editor. For example, if we wanted to edit all content under the Page post type with the new editor, while leaving everything else alone, we could use the code sample below:
This has the same effect as clicking the Page checkbox under Settings > Writing, but allows us to keep this configuration change in code. If you go back to Settings > Writing you will see that the checkbox for the post type that you are controlling through code is now grayed out and cannot be checked.
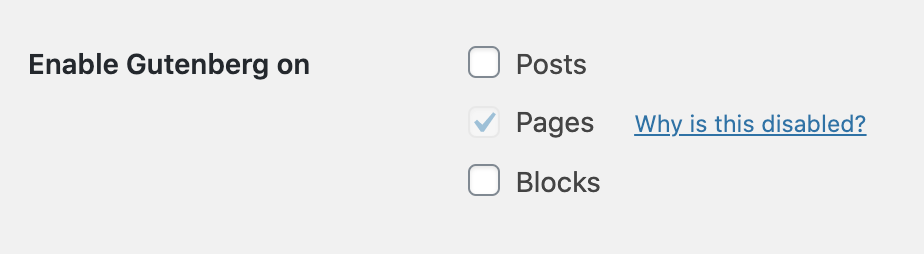
Disabled Gutenberg Ramp Interface
If you click on the “Why is this disabled?” link, it takes you to documentation that explains:
“If you’re seeing something greyed out, it means the gutenberg_ramp_load_gutenberg() function is already in your theme functions.php. If you want to use the wp-admin UI, remove the conflicting function from your functions.php file.”
This makes sense. Your settings should only be managed in one place to avoid conflicts and if you’re managing them in code, you probably won’t be looking at this admin interface anyway.
Enable for certain posts
If you’re looking to transition to Gutenberg for only certain pieces of content, then the post type option detailed above is still a little too broaad for you. Luckily, Gutenberg Ramp does allow your to specify post IDs that should be editable using the new editor while leaving the remainder of your content untouched. The code looks very similar to how we specify post types:
A caveat to watch out for: if you’re using multiple environments (and you should be!) content might not have consistent post IDs across these environments, depending on how they’re set up. For example, if you’re trying to enable the block editor on the About page of your site, it might be post ID 4 in production, but post ID 7 on Staging and maybe 23 on your local. In this case, enabling hard-coded post IDs may have unexpected results.
Specifying specific post IDs can also be combined with enabling entire post types. For example, if we wanted to use the new block editor on all the post types we specified above, but ALSO for all pages, you would use the following snippet:
As you can see, you can go pretty far with the Gutenberg Ramp plugin, but to get around the example with the About page that wee talked about above, you need to go a bit further.
Completely custom criteria with the use_block_editor_for_post filter
If you need to get even more custom with your criteria for enabling the new editor, you can tap into a WordPress filter called use_block_editor_for_post. This filter passes in the current post so it can be evaluated and expects a boolean return value (true or false) as to whether that post should use the block editor. This gives you ultimate flexibility because you can find out anything and everything about the post before you decide whether you should enable the block editor. You can query for post meta, you can look at post dates, and much more. Keep in mind, however, that writing a slow meta query will definitely impact wp-admin performance, so don’t go too crazy.
However, if you looked at your content and decided to pick a point where all your content going forward should use the new block editor, you can do that with this filter. Find the post ID where you want your cut off point to be and use a snippet like:
Since post IDs are incremented with each new post, anything posted after post ID 106 will now use the new block editor.
You could use this filter to enable the new editor on posts by title (which would clear up the confusion of the About page in our earlier example) as well as any other custom criteria, which I’ll leave as an exercise for the reader. However, let’s look at one final example: enabling the block editor for posts that are using a certain template.
Enabling the block editor for a specific template
Another common pattern when upgrading a site to the new Block Editor is building out a new template specifically for this new content. We can use the same use_block_editor_for_post filter to enable the new editor for any posts that are using that new template.
First, create your new template file in your theme. Make sure it has a template name (usually left as a php comment at the very top of the template file:
<?php/* Template Name: Gutenberg Template */
Code language:HTML, XML(xml)
Once you have this template set up, you should see it as an option in the template dropdown on the Edit Post screen. You can then select this template for any posts that you want to use the new template. Make sure to click “Update” to save your changes!
Finally, we need to use our filter again to let WordPress know which posts should have the block editor enabled.
Swap out template-gutenberg.php for whatever the filename of your new template is. You’ll now notice that whenever you select that template from the template dropdown for a given post, that post switches to using the Block Editor! Note: you may need to refresh after clicking Update to see your changes take effect.
The new Block Editor is here to stay
Whether you’re a fan of the new editor or not, there’s no doubt that it is the way forward for WordPress. If you’re not ready to jump in with both feet, the Gutenberg Ramp plugin can help you step in one toe at a time.