Deployment is the stage of the software development life cycle most likely to cause problems. Even if your deployment pipeline is perfectly set up, it’s the stage of the development process where any bugs you didn’t catch while building or during QA get shipped out to your end users. This might mean you need to roll back, or at the very least track down the problematic deploy at some point in the future.
Just looking for the workflow files instead of the explanation? Click here to skip to the final workflow files below.
Most modern deployment tools handle this by making deployments both automatic and repeatable, meaning that you can deploy with confidence and roll back when necessary (If your deployment processes aren’t like this right now, look for another post coming from us very soon!). However some of your clients may still depend on hosting infrastructure that requires deploying via FTP, which is much harder to automate and very difficult to roll back if needed.
Luckily, even if you are forced to use FTP as a deployment mechanism, GitHub Actions can help make this both an automatic and repeatable process to make deploys go much more smoothly. Let’s take a look at how this works.
Introducing GitHub Actions
GitHub Actions launched recently to make it “easy to automate all your software workflows”, which is exactly what we’re trying to do here. As long as your code is hosted in a GitHub repository, you can use GitHub Actions. Actions are YAML files called workflows that fire in response to certain events around a repository, such as a push to a particular branch, a pull request being merged, or a release being tagged. Actions are commonly used for running tests against pull requests to ensure they’re ready to be merged, or to run the build tooling for a particular codebase.
However, you’re not limited to these common use cases. There are pre-built GitHub actions to help you with most anything you can think of. In our example, we’ll put a couple of these pre-built actions together to create an automatic and repeatable FTP deployment pipeline.
What are we trying to do?
In our specific example, we had to run a couple build steps to generate the correct built files in our WordPress theme, and then deploy that built theme via FTP to either staging or production, based on whether the changes we had made since the last deploy were ready to be reviewed by our client or ready to be reviewed by the world.

We will differentiate between these two by creating two different workflow files: one for staging and one for production. We will trigger the staging workflow anytime code is pushed to the master branch (or a PR is merged to master) and we will trigger the production workflow by tagging a release. It’s much harder to tag a release accidentally than it is to accidentally push to master, so this makes sure that changes don’t go out to production until we’re absolutely sure they’re ready.
Setting up GitHub Actions
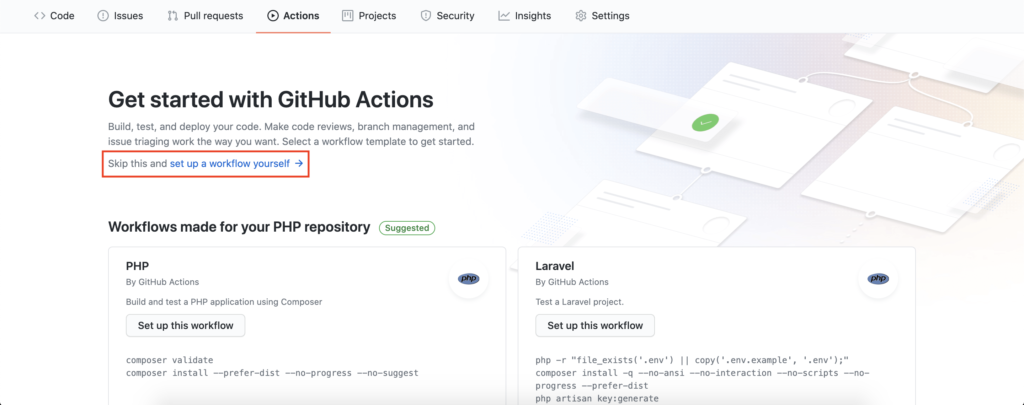
If you haven’t created any Actions in your repository yet, the easiest way to get started is to click on the Actions tab in the repository and you’ll be presented with the GitHub Actions splash screen. GitHub will suggest a couple common actions based on the language it detects your repository uses primarily, but since we’re doing something just a bit out of the box, click on Skip this and set up a workflow yourself.
Once you click on that, you’ll be taken into the main GitHub Actions interface where you can start to edit the YAML file that will make up your first workflow. To keep our workflows separate, we’ll name our first one staging.yml just so we can keep track of where we’re deploying. To make sure we don’t lose our work, go ahead and commit this initial file by clicking on the big green Start commit button in the top right corner.
Now that you’ve got a workflow committed, if you have the repository cloned down locally, you can edit this workflow inside your favorite text editor by navigating to the .github/workflows directory that’s inside the repository root. If you’d rather keep editing inside the GitHub GUI, that’s fine too.
Creating our first Action
Now that we have our staging.yml file set up, let’s clear it out so we can start filling it with our own workflow steps. Keep in mind that because this is YAML, spacing and indentation matters, so if you start getting any weird errors, check to make sure that you’re either using tabs or spaces (we’re not going to start that flamewar here) across the entire file and that everything is indented correctly. Let’s break the pieces of this workflow file down step by step.
First we want to give our workflow a name. Anything is fine, but something like Staging Deploy probably makes the most sense. This is important so that if you see that a workflow has failed, you can easily know whether it was a staging deployment or a production deployment. After that, we need to tell GitHub when it should trigger our workflow. In this case, we want our staging deployment to trigger any time new code is pushed to master.
name: Staging Deploy
on:
push:
branches: [ master ]
Code language: HTTP (http)Side note: Any pull requests merged to master technically count as code getting pushed to master, so this workflow will also trigger whenever a pull request is merged to the master branch.
Next, we need to give our Action some information about the environment we want it to run in and any other default variables we want it to use. We default to using ubuntu-latest for the runtime environment and bash as the default shell. These defaults work well for most workflows and should only really be changed if you know what you’re doing. In addition to those, we will set the working-directory variable so that we don’t have to specify this directory on each step of our workflow.
name: Staging Deploy

on:
  push:
    branches: [ master ]
jobs:
  build:
    runs-on: ubuntu-latest
    defaults:
      run:
        shell: bash
        working-directory: ./themes/our-awesome-theme
Code language: HTTP (http)
Side note: Workflow steps run in the root of the repo by default. We only specify our working directory because the root of our GitHub repo is not where we want our action to run.
Adding some Workflow steps
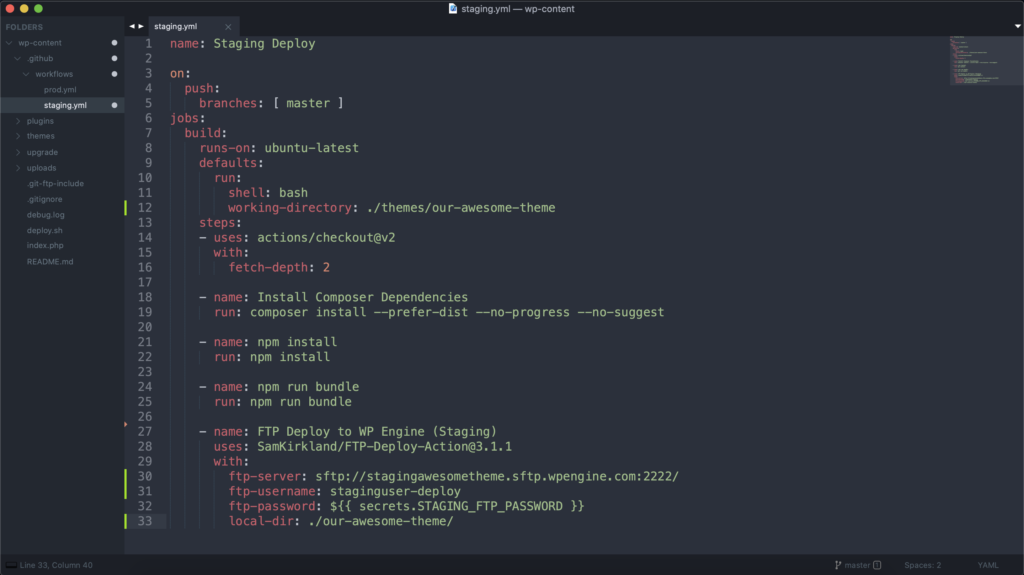
Now that we’ve got our workflow configured and the workflow environment specified, we can start adding steps. The first step we’re going to take is to checkout the actual git repo into the environment we just set up inside the Action. We can use a pre-built Action for this. That’s what actions/checkout@v2 is specifying here.
name: Staging Deploy

on:
  push:
    branches: [ master ]
jobs:
  build:
    runs-on: ubuntu-latest
    defaults:
      run:
        shell: bash
        working-directory: ./themes/our-awesome-theme
    steps:
    - uses: actions/checkout@v2
      with:
        fetch-depth: 2
Code language: HTTP (http)
After that, we can continue adding steps. If our steps are just shell commands, they can be relatively simple. They need a name and then the command to be run.
name: Staging Deploy

on:
  push:
    branches: [ master ]
jobs:
  build:
    runs-on: ubuntu-latest
    defaults:
      run:
        shell: bash
        working-directory: ./themes/our-awesome-theme
    steps:
    - uses: actions/checkout@v2
      with:
        fetch-depth: 2

    - name: Install Composer Dependencies
      run: composer install --prefer-dist --no-progress --no-suggest

    - name: Install NPM packages
      run: npm install

    - name: Generate bundled theme with all assets
      run: npm run bundle
Code language: HTTP (http)
Now that our ready-built theme has been generated, the last step is to actually run the FTP deploy. If you’re not well-versed in running an FTP deploy in an environment like this (and don’t worry, neither am I), this is where we again leverage a pre-built Action to help us. In our case, we used SamKirkland’s FTP-Deploy-Action. To use this Action, we have to specify it in the workflow file and provide it with all the necessary parameters. You can read more about specific parameters that might apply to your use case in the linked documentation, but here’s how it looked for us.
name: Staging Deploy

on:
  push:
    branches: [ master ]
jobs:
  build:
    runs-on: ubuntu-latest
    defaults:
      run:
        shell: bash
        working-directory: ./themes/our-awesome-theme
    steps:
    - uses: actions/checkout@v2
      with:
        fetch-depth: 2

    - name: Install Composer Dependencies
      run: composer install --prefer-dist --no-progress --no-suggest

    - name: npm install
      run: npm install

    - name: npm run bundle
      run: npm run bundle

    - name: FTP Deploy to WP Engine (Staging)
      uses: SamKirkland/FTP-Deploy-Action@3.1.1
      with:
        ftp-server: sftp://stagingawesometheme.sftp.wpengine.com:2222/
        ftp-username: staginguser-deploy
        ftp-password: ${{ secrets.STAGING_FTP_PASSWORD }}
        local-dir: ./our-awesome-theme/
Code language: HTTP (http)
Looks great, right? You might notice that we don’t include our ftp-password in this workflow file. Because these files are committed directly to the repo and storing credentials or other sensitive information in version control is never a good idea, we have to use another GitHub tool called Secrets.
Using Secrets to keep credentials, well…secret
If you click on the Settings tab on your GitHub repo, you’ll see a few different options in the left hand navigation, one of which is Secrets.
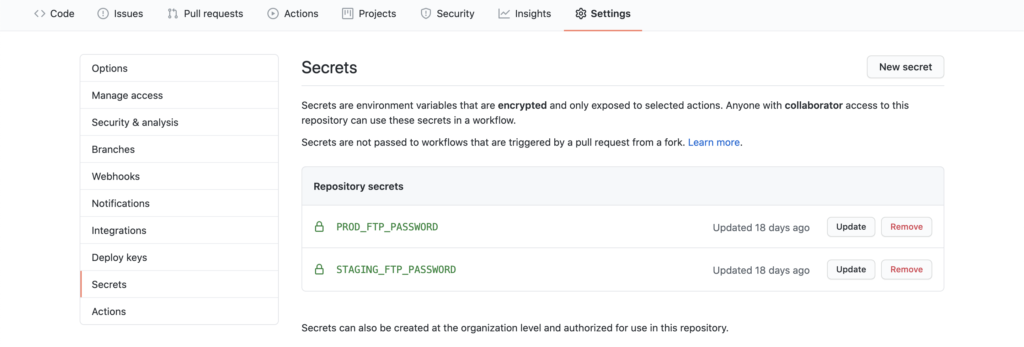
By clicking on Add Secret you can specify a name for the secret (PROD_FTP_PASSWORD or STAGING_FTP_PASSWORD in our screenshot above) and then actually paste in your password, which GitHub will store securely. As you can see from the interface above, after that, the password is not accessible. It can be updated or removed, but not accessed.
Now that we have our credentials securely stored you can reference them in your workflow file using the format ${{secrets.STAGING_FTP_PASSWORD}}, substituting STAGING_FTP_PASSWORD for whatever you named your secret. If you have even more strict security restrictions, your FTP URL and FTP Username could be stored in Secrets and referenced in the same way as well.
Testing our Staging Deployment Workflow
Now that we have our workflow set up (make sure it’s committed!), it’s time to test. Since we configured this workflow to fire on a push to the master branch, that’s what we need to do to test that everything is working as expected. An easy change to test is to push an HTML comment in a particular place where you know it will get output on the frontend of your staging site.
Once you do that, you can go over to the Actions tab in your repo and see your first Action running. If you click into the Action itself, you will be able to see each of the individual steps running and whether they passed or failed. Once all the steps have passed, you should see the elusive green checkmark.
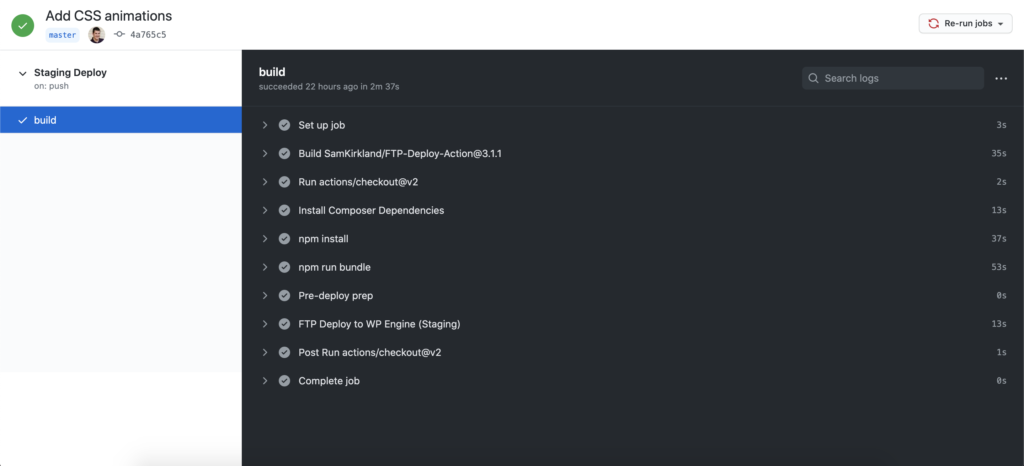
Then it’s time to head over to your staging site and check whether you see the HTML comment you inserted into the source code to test your deployment pipeline.
Congratulations! You’ve just created your first workflow and you’ll never have to hear the question “Is that change deployed to staging?” ever again! Anyone with the proper permissions can go into the Actions tab and see when a particular commit triggered a run of the workflow (staging deploy).
Creating the Production Deployment Action
To create our Production Deployment workflow, copy our staging.yml file into a file in the same directory called production.yml. Our production deployment action will be the exact same as our Staging Deployment action with three notable exceptions.
First, we want to change the name at the very top of the workflow from Staging Deployment to Production Deployment. This ensures that when we’re looking at runs of the workflow inside the GitHub Actions interface, we’ll be able to tell them apart.
Second, we want to change the conditions on which this workflow triggers. Instead of triggering on a push to the master branch like our staging workflow, we only want to trigger this workflow when someone tags a release. This means we need to modify the top part of our workflow as follows:
name: Production Deploy

on:
  release:
    types: [published]
Code language: HTTP (http)
Finally, our FTP credentials will be different. If you used Secrets to keep your credentials secure (please tell me you did), you need to add your production credentials to Secrets as well and then update them within the workflow file itself. This means that our FTP step will look something like this:
- name: FTP Deploy to WP Engine (Production)
      uses: SamKirkland/FTP-Deploy-Action@3.1.1
      with:
        ftp-server: sftp://prod440.sftp.wpengine.com:2222/
        ftp-username: produser-deploy
        ftp-password: ${{ secrets.PROD_FTP_PASSWORD }}
        local-dir: ./our-awesome-theme/
Code language: JavaScript (javascript)
Testing our Production Deployment Workflow
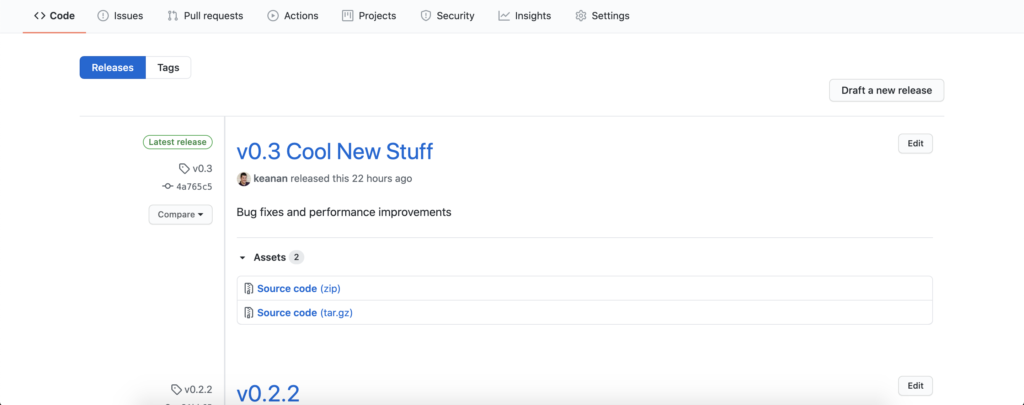
Since we still have our test HTML comment committed from testing our Staging Deployment workflow, we can test this relatively easily. Once the new Production Deployment workflow is committed, you can go to the Releases area of your repo and click on Draft a new release. Filling out the necessary fields will tag a new release and once that’s completed you should see that your new workflow has been triggered under the Actions tab of your repo.
Once all the steps have passed, you should see the elusive green checkmark. Then it’s time to head over to your production site and check whether you see the HTML comment you inserted into the source code to test your deployment pipeline.
If so, you’ve now got a fully automated, multi-environment deployment pipeline. Your DevOps certification on LinkedIn won’t be far away!
Wrapping Up
Even when you have to deploy over FTP, that doesn’t mean you can’t have automated, repeatable deploys. Setting up a deployment pipeline like this helps use modern development practices like version control, testing and other automation while still fitting your workflow into your client’s infrastructure requirements. If you’re looking for even more inspiration, check out the Marketplace where you can find all the pre-built actions that people have created.
How can we help?
Looking to automate your developer workflow and make your developers more productive? Reach out to hello@alphaparticle.com or use the form below and let’s talk about how we can help.
Example Files
name: Staging Deploy

on:
  push:
    branches: [ master ]
jobs:
  build:
    runs-on: ubuntu-latest
    defaults:
      run:
        shell: bash
        working-directory: ./themes/our-awesome-theme
    steps:
    - uses: actions/checkout@v2
      with:
        fetch-depth: 2

    - name: Install Composer Dependencies
      run: composer install --prefer-dist --no-progress --no-suggest

    - name: npm install
      run: npm install

    - name: npm run bundle
      run: npm run bundle

    - name: FTP Deploy to WP Engine (Staging)
      uses: SamKirkland/FTP-Deploy-Action@3.1.1
      with:
        ftp-server: sftp://stagingawesometheme.sftp.wpengine.com:2222/
        ftp-username: staginguser-deploy
        ftp-password: ${{ secrets.STAGING_FTP_PASSWORD }}
local-dir: ./our-awesome-theme/Code language: HTTP (http)name: Production Deploy
on:
release:
types: [published]
jobs:
build:
runs-on: ubuntu-latest
defaults:
run:
shell: bash
working-directory: ./themes/our-awesome-theme
steps:
- uses: actions/checkout@v2
with:
fetch-depth: 2
- name: Install Composer Dependencies
run: composer install --prefer-dist --no-progress --no-suggest
- name: npm install
run: npm install
- name: npm run bundle
run: npm run bundle
- name: FTP Deploy to WP Engine (Production)
uses: SamKirkland/FTP-Deploy-Action@3.1.1
with:
ftp-server: sftp://prod.sftp.wpengine.com:2222/
ftp-username: produser-deploy
ftp-password: ${{ secrets.PROD_FTP_PASSWORD }}
local-dir: ./our-awesome-theme/Code language: HTTP (http)