You may have heard that WordPress has a brand new block editor that completely transforms the writing and content management experience. However, there are plenty of sites that aren’t ready to move their entire base of content over to the new editor. This could be because not all of their plugins are compatible with the new editor or their editorial team isn’t ready to have a totally new editing experience.
(If this is you, we can help! We’re only an email away at hello@alphaparticle.com.)
Luckily, there is a plugin that can help you move your content gradually into the new editor: Gutenberg Ramp. This plugin hasn’t been written about a ton, so when I mentioned it in a conference talk back in 2019, there were some requests for a more in-depth demo.
If you’re more of a video person, I’ve walked through the same use cases and demos that I’ll detail in this post as a Youtube video:
Downloading and installing the plugin
Gutenberg Ramp can be downloaded and installed just like any other plugin. Either search for it in the Plugins section of wp-admin, or download the ZIP file and place it in the plugins directory of your WordPress installation. Once you’ve chosen one of these methods, go into wp-admin and activate the plugin.
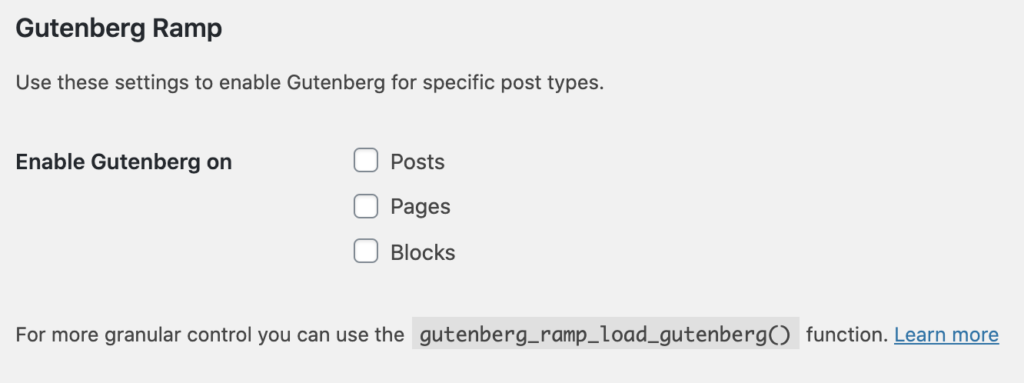
At this point, you should notice that all your content is now editable using the Classic Editor. You’ll also notice that you have a section labeled “Gutenberg Ramp” under the Settings > Writing menu and that’s where we’re going to start.
Enable for an entire post type
A popular use case for Gutenberg Ramp is to enable the new editor on pages to start to deliver a rich editing experience for those updating page content, while letting everyone else writing posts to have the same experience they’re used to. Others have a custom post type that’s published less frequently but could really benefit from blocks and want to learn the ropes of the new editor using that post type.
As we saw in the screenshot above, the Gutenberg Ramp plugin makes both these workflows very simple. Go into Settings > Writing and check the box for the post type you want to enable the new editor on. Make sure to Save Changes, and that’s it! All posts of any of the post types you checked will now use the new block editor, while leaving the rest of your content to use the Classic Editor experience.
Enable for an entire post type (using code)
Maybe (hopefully!) your codebase is under version control and you would like to keep as many of your configuration changes stored in code as possible. Gutenberg Ramp supports this workflow as well. In functions.php (or wherever you keep your modifications and additions to WordPress hooks and filters), you can use the gutenberg_ramp_load_gutenberg function to specify rules for which content is editable with the new editor. For example, if we wanted to edit all content under the Page post type with the new editor, while leaving everything else alone, we could use the code sample below:
gutenberg_ramp_load_gutenberg(
[
'post_types' => [ 'page' ],
]
);Code language: PHP (php)This has the same effect as clicking the Page checkbox under Settings > Writing, but allows us to keep this configuration change in code. If you go back to Settings > Writing you will see that the checkbox for the post type that you are controlling through code is now grayed out and cannot be checked.
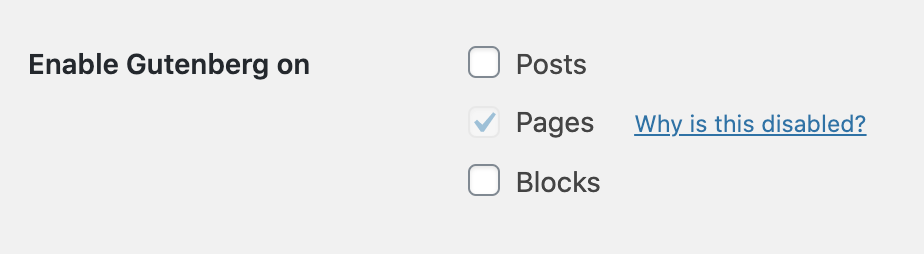
If you click on the “Why is this disabled?” link, it takes you to documentation that explains:
“If you’re seeing something greyed out, it means the gutenberg_ramp_load_gutenberg() function is already in your theme functions.php. If you want to use the wp-admin UI, remove the conflicting function from your functions.php file.”
This makes sense. Your settings should only be managed in one place to avoid conflicts and if you’re managing them in code, you probably won’t be looking at this admin interface anyway.
Enable for certain posts
If you’re looking to transition to Gutenberg for only certain pieces of content, then the post type option detailed above is still a little too broaad for you. Luckily, Gutenberg Ramp does allow your to specify post IDs that should be editable using the new editor while leaving the remainder of your content untouched. The code looks very similar to how we specify post types:
gutenberg_ramp_load_gutenberg(
    [
        'post_ids'   => [ 182, 184, 192 ],
    ]
);Code language: PHP (php)
A caveat to watch out for: if you’re using multiple environments (and you should be!) content might not have consistent post IDs across these environments, depending on how they’re set up. For example, if you’re trying to enable the block editor on the About page of your site, it might be post ID 4 in production, but post ID 7 on Staging and maybe 23 on your local. In this case, enabling hard-coded post IDs may have unexpected results.
Specifying specific post IDs can also be combined with enabling entire post types. For example, if we wanted to use the new block editor on all the post types we specified above, but ALSO for all pages, you would use the following snippet:
gutenberg_ramp_load_gutenberg(
    [
        'post_types' => [ 'page' ],
        'post_ids'   => [ 182, 184, 192 ],
    ]
);Code language: PHP (php)
As you can see, you can go pretty far with the Gutenberg Ramp plugin, but to get around the example with the About page that wee talked about above, you need to go a bit further.
Completely custom criteria with the use_block_editor_for_post filter
If you need to get even more custom with your criteria for enabling the new editor, you can tap into a WordPress filter called use_block_editor_for_post. This filter passes in the current post so it can be evaluated and expects a boolean return value (true or false) as to whether that post should use the block editor. This gives you ultimate flexibility because you can find out anything and everything about the post before you decide whether you should enable the block editor. You can query for post meta, you can look at post dates, and much more. Keep in mind, however, that writing a slow meta query will definitely impact wp-admin performance, so don’t go too crazy.
However, if you looked at your content and decided to pick a point where all your content going forward should use the new block editor, you can do that with this filter. Find the post ID where you want your cut off point to be and use a snippet like:
function enable_gutenberg_for_select_posts( $can_edit, $post ) {
	return $post->ID >= 106;
}
add_filter( 'use_block_editor_for_post', 'enable_gutenberg_for_select_posts', 10, 2 );Code language: PHP (php)
Since post IDs are incremented with each new post, anything posted after post ID 106 will now use the new block editor.
You could use this filter to enable the new editor on posts by title (which would clear up the confusion of the About page in our earlier example) as well as any other custom criteria, which I’ll leave as an exercise for the reader. However, let’s look at one final example: enabling the block editor for posts that are using a certain template.
Enabling the block editor for a specific template
Another common pattern when upgrading a site to the new Block Editor is building out a new template specifically for this new content. We can use the same use_block_editor_for_post filter to enable the new editor for any posts that are using that new template.
First, create your new template file in your theme. Make sure it has a template name (usually left as a php comment at the very top of the template file:
<?php
/* Template Name: Gutenberg Template */Code language: HTML, XML (xml)
Once you have this template set up, you should see it as an option in the template dropdown on the Edit Post screen. You can then select this template for any posts that you want to use the new template. Make sure to click “Update” to save your changes!
Finally, we need to use our filter again to let WordPress know which posts should have the block editor enabled.
function enable_gutenberg_on_gutenberg_template( $can_edit, $post ) {
	return 'template-gutenberg.php' === get_page_template_slug( $post->ID );
}
add_filter( 'use_block_editor_for_post', 'enable_gutenberg_on_gutenberg_template', 10, 2 );Code language: PHP (php)
Swap out template-gutenberg.php for whatever the filename of your new template is. You’ll now notice that whenever you select that template from the template dropdown for a given post, that post switches to using the Block Editor! Note: you may need to refresh after clicking Update to see your changes take effect.
The new Block Editor is here to stay
Whether you’re a fan of the new editor or not, there’s no doubt that it is the way forward for WordPress. If you’re not ready to jump in with both feet, the Gutenberg Ramp plugin can help you step in one toe at a time.
If you’re looking for help making this crucial transition into the modern era of WordPress, check out my talk Helping your Team Transition to Gutenberg on WordPress.tv, or send us an email at hello@alphaparticle.com and let’s talk about how we can help.