What is OAuth?

Verifying someone’s identification on the web can be tough, but there are a few services that we trust to be the true source of someone’s online presence. How can we use these services to verify someone’s identity to prevent them from having to create yet another online account? That’s where OAuth comes in.

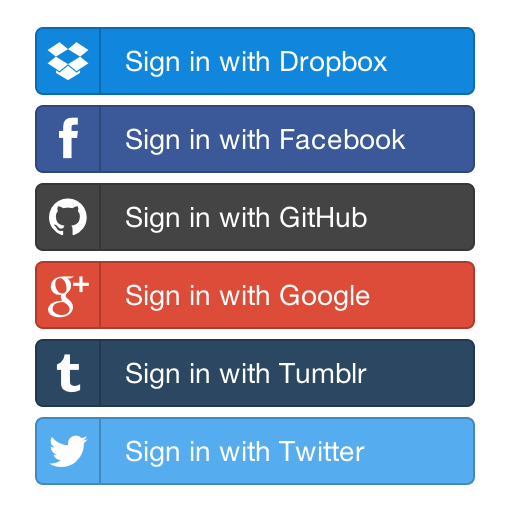
You may or may not have heard of OAuth but I’m sure you’ve seen log in options that look something like this:

But how does a website get access to your Twitter account without requiring your username or password? That’s exactly what OAuth helps with. OAuth is a “a secure authorization protocol that deals with the authorization of third party application to access the user data without exposing their password”.

Where is OAuth used?

Let’s say I’m building a site where I want people to log in and allow people to see their most popular tweets over the past year. Instead of creating a new login system specific to my site, it would make sense to use their existing Twitter account to login, right? The problem is, a new user shouldn’t trust a web service with their Twitter username and password. By providing a “Sign in with Twitter” button, I allow new users to use their existing Twitter account to authenticate with my application without sharing their Twitter credentials with me.

How OAuth works behind the scenes

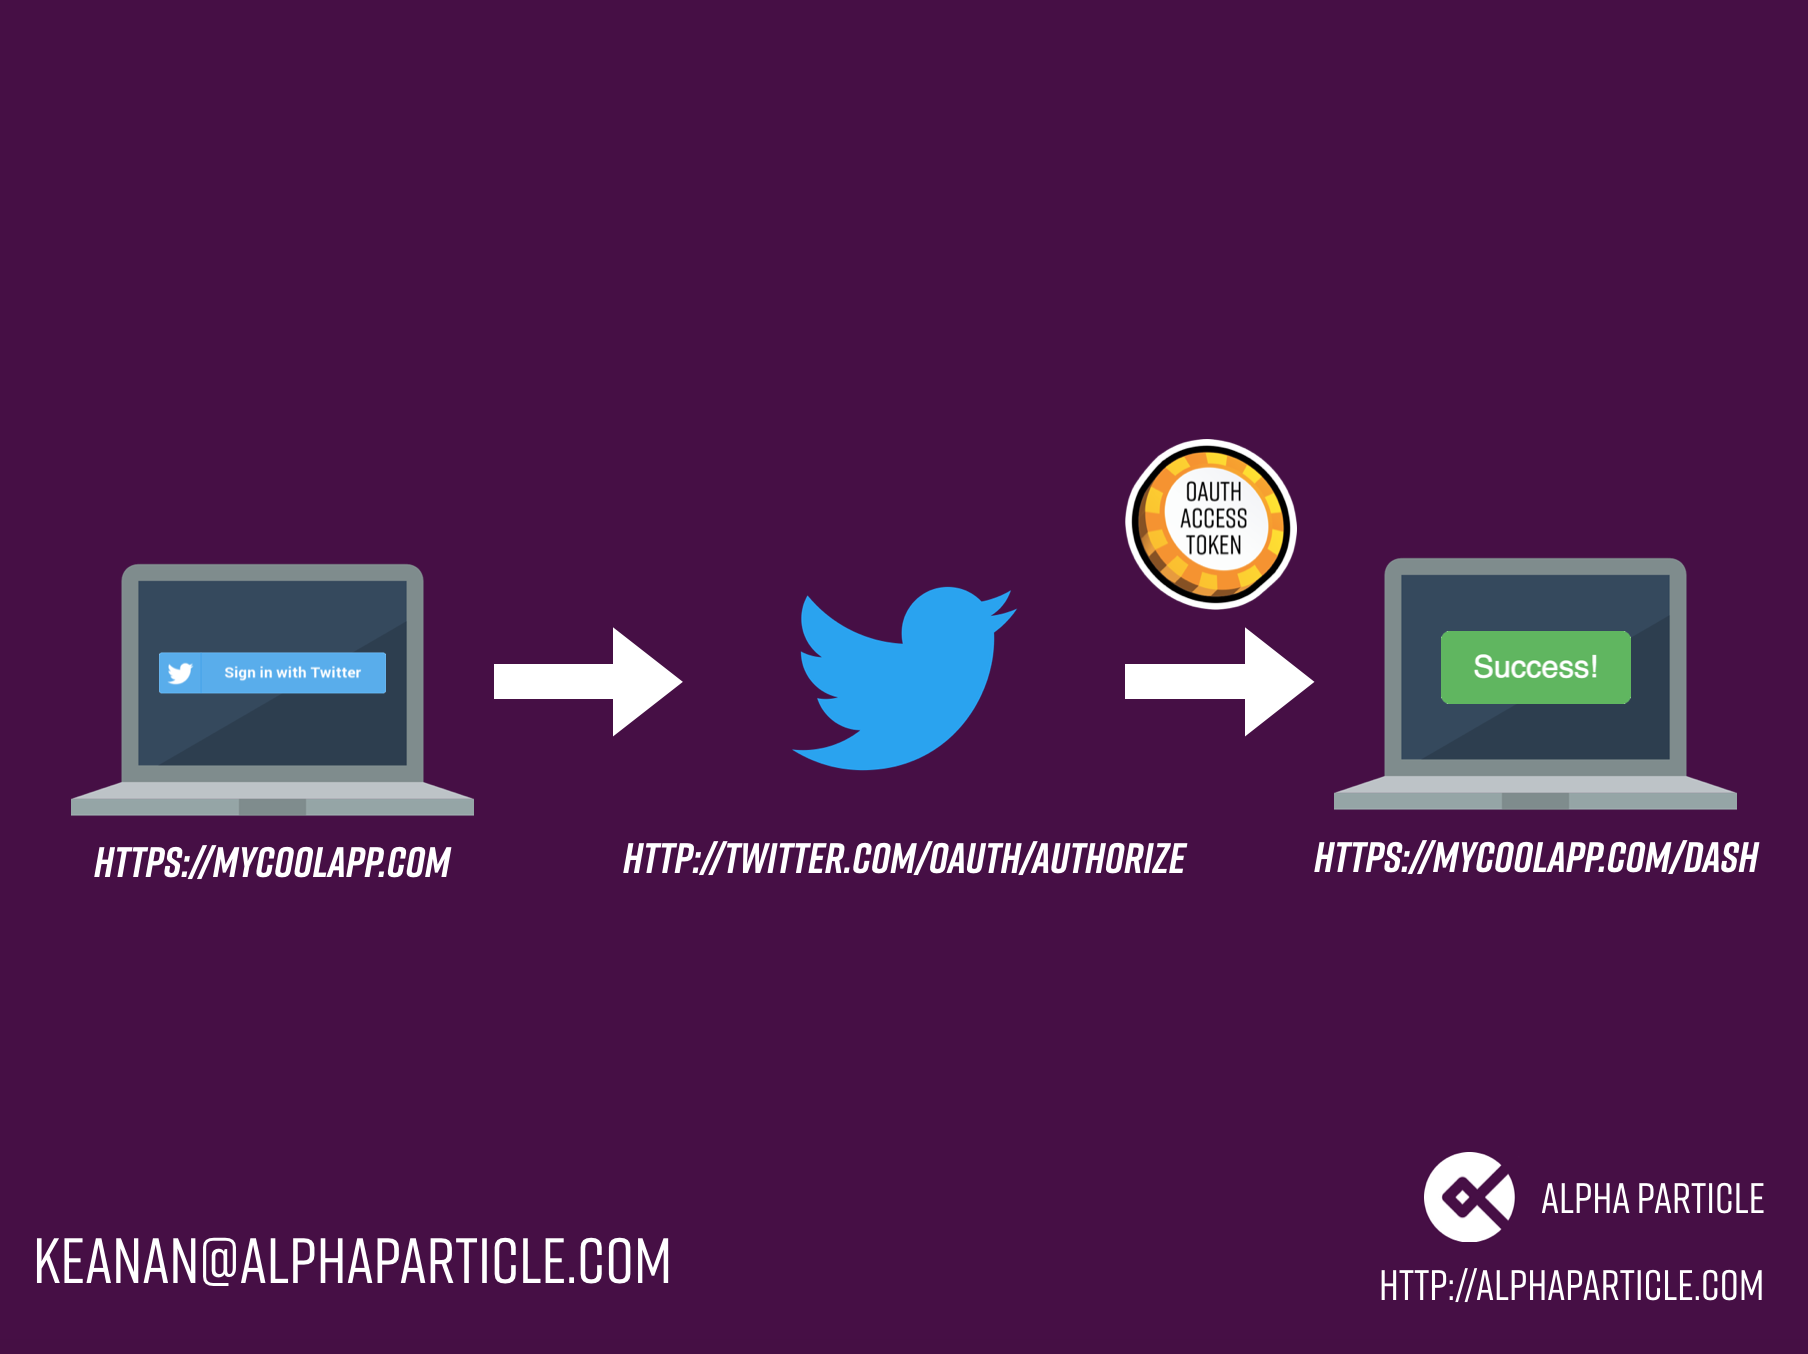
There are three important pieces in any OAuth transaction: the client (my “best tweets” application in our example), the provider (Twitter), and the owner (the user trying to login to my app). To enable OAuth, I have to tell Twitter I’m going to let people login with their service and provide them a redirect URL. A redirect URL is where I want Twitter to redirect the user after they’re done logging in and approving my app for access. In exchange, Twitter will give me a set of tokens and keys needed to make the request and confirm that it’s my app making the login request.

Once all this is set up, we can start the login process. When our user clicks the “Sign in with Twitter” button, my site directs them to Twitter and gives Twitter our App ID. Twitter asks the user to confirm they’re logging in to my app and redirects them back to the redirect URL that I specified. My app also gets a token that confirms the user has authenticated with Twitter. I can store this token and use it to retrieve the information about the user that they’ve approved me to access. My app has now authenticated through Twitter without providing me their Twitter credentials.

What are some of the benefits of OAuth over just general API access?

One of the biggest benefits of OAuth is that a user can grant a service certain permissions. When authenticating, the owner will usually see a dialog from the OAuth provider:

What can the client do with OAuth permission?

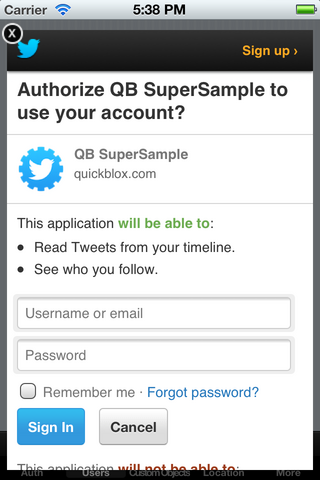
This is helpful as it gives the user information about how exactly I’m going to use their account. In the above example, it would be good to know that the app I’m authorizing can’t post tweets to my timeline impersonating me. For social networks implementing plugins or add-ons, OAuth can be a great way to allow access to untrusted services.

How can OAuth be useful to your business?

One concrete example where OAuth can be useful is systems integration. For businesses with microservices or different systems deployed that need to share credentials, OAuth can provide the framework for these to communicate. Usually, we see credential-sharing between applications that’s inherently insecure. Deploying OAuth can help secure these services while allowing them to share the necessary information to keep your systems up and running. If you’d like to chat about whether implementing OAuth might be right for you, use the contact form below or reach out at hello@alphaparticle.com.

What is a Load Balancer?

As your website gets more popular, you may find that your server is getting more and more strained with the extra traffic load. There are many things you can do to take the strain off of an overworked web server, but this week, we’re going to look at load balancing.

The basic idea behind load balancing is that instead of having just one web server with all your code running on it, you have multiple.  Let’s say that we set up 3 web servers and deploy your code to each one. This means that any of these 3 servers could handle an incoming request, but now you need something to decide which of the 3 servers should be given each next request.

That’s where a load balancer comes in. A load balancer is what handles all the incoming traffic and decided which server should handle the request. It takes an incoming request and routes it to a specific server as well as handles returning the response to the user’s browser.  For an example of how this works, take a look at the diagram below.

To handle all this traffic shuffling, a load balancer can use a variety of algorithms.  Ultimately, choosing which algorithm to use depends on how your site functions, but the two most popular options are:

  • Round Robin: Each subsequent request is allocated to the group of servers sequentially based on when the request comes in.
  • Least Connections: When a new request comes in, the load balancer looks at which server has the least open connections and allocates the new request to that server.  This means that generally, the servers will stay the most balanced.

These can be configured on the load balancer itself and after you decide on an algorithm you should continue to monitor your servers to make sure none of them are getting overloaded.  

While load balancers are great, implementing a more complicated server architecture is not without it’s challenges. In particular, if the browser and the server need to exchange information specific to the user (for example, items in a shopping cart), then it’s important that the same server be used for the entirety of the user’s session.  In this case, you can utilize a concept known as “sticky sessions” (also known as session persistence or session affinity). With sticky sessions enabled, the load balancer will ensure that a single user’s request is passed to the same backend server on each request in a given session.

To learn more about load balancers, you or your development team can read the documentation for your infrastructure provider using some of the links below:

With one of these solutions in place, you will ensure that your website can scale to any level of traffic by adding more servers and letting the load balancer handle the routing behind the scenes.

Curious about whether a load balancer might work for your product? Use the contact form below to let us help you determine your infrastructure needs.

Scoping Digital Projects

Earlier this month I spoke at a conference where I gave a presentation titled Scoping Digital Projects as a Non-Developer (slides from my presentation available here).  Despite my presentation’s qualifier of ‘Non-Developer’ in the title, the principles of estimating the scope of a project are the same no matter what role you fill within your organization.  In this post I will be offering an overview of a generalized scoping process that I have successfully used in the past.  Though it is possible to go far into detail for each of the steps in the process, that will be covered in a later post.

First, a few assumptions:

  • Methodology – The process of decomposing large, partially defined features into smaller, simply defined components and feature sets is necessary whether you are using a waterfall method, agile, or elements of both.
  • Flexibility – This is but one method of scoping projects.  I have worked on projects where other methods were successfully employed.  You should always examine your process to make sure you are applying the right tool for the task.
  • Client projects vs internal projects – Simply put, it does not matter.  In my presentation I used a simple project for an imaginary client as an example.  However, a commonly made mistake is not applying the same process to internal projects.  

The Importance of Project Scoping

It is easy to think about scoping a project to simply answer “How long will this take?”  But that does not reflect the true importance of accurately estimating scope.  Judging what will go into a project (time & money, adjusted for risk) is really all about informing all of the project stakeholders of the facts so they can make informed decisions.  That includes the project team and the client (along with their entire organization), among others.  It is important to remember that no matter how much power the project organizer has, they still likely have a boss that needs to be provided information about where resources are being used.

Once the resources needed are identified, it makes the importance of scoping clear in another way: prioritization of features.  Not once have I ever worked on a project where feature priority has not mattered.  Sometimes features get cut to save costs.  Sometimes a client does not realize that a low value feature uses significant resources.  Almost always there is a new feature that is introduced by a stakeholder during the build process.  If feature priority has not been addressed, then it is impossible to determine if or when that new feature should be built.

Client Communication

The initial communication with a client or project sponsor should be all about project goals.  In this phase, the “why” of any project is more important than the “how”.  The reason is simple, every member of the project team should be continually making decisions in support of the project goals.  If there are tasks that do not support the project goals, then either the goals need to be restated or the task should be moved to different project (with a different scope).

Once goals are established, it is time to discuss any major limitations that any of the involved parties has.  These often include:

  • Designer and developer availability
  • Budget
  • Hard launch dates
  • Contractual requirements, such as requiring that the client’s MSA be used
  • Stakeholder review process

That last point, stakeholder review process, is important and often overlooked.  It is easy for a project manager to assume that when their client-side contact approves a piece of work that the review process is complete.  Sometimes it is, but sometimes the client’s CEO views the work two weeks later and requests changes.  If a process for handling that work has not been discussed ahead of time, then serious problems could occur.  Instead, establish how all parties will fit into the review and approval process.  Be flexible if changes to that process are needed, but be honest when sharing how that changes scope.

Information Architecture

Whether a simple marketing website is being built, or a large and complex application, defining information architecture (IA) is essential for defining a project scope.  The topic of information architecture is deserving of its own series of posts, so I will only cover it briefly here.  

IA can affect scope by determining:

  • What content is static and what is controlled by human
  • What content is controlled by the software being built and what is dependent upon outside sources
  • Who will produce content and who will actually input it into the new software

If an IA professional or an UX Designer is available to the team, it is important to engage them throughout the entire project, but especially when determining architecture.  One of the simple ways to establish and communicate architecture is with IA documents.  There are many different types and variations of IA documents, but I often choose from a short list of six. Often time, only a subset of these is needed and all should be modified to meet the needs of the project.

  • User Flows – Defines how a user navigates a piece of software.  Mostly used in applications with complex functionality.
  • Site Map – A list of all pages and their hierarchy.
  • Content Matrix – A tool to define content for all individual pieces of content on a site.  Can take many different forms.
  • Wireframes – The ‘blueprint’ of a site or application completed before design is undertaken.  Often overlooked once hi-fi designs are provided, but should be referenced throughout the project.
  • Feature Descriptions – A list of all important features, their functions, and their goals.  Can be a general “executive summary” or very detailed.  
  • User Stories – Highly depended on the project management methodology used, but generally a list of tasks that users will be able to perform.

Decomposition Into Components

This is the heart of estimating the scope of a project, regardless of what methodology is used. By breaking a project into smaller parts, we can more accurately gauge the time needed to complete a component and the risk associated with that component. The concept is simple, estimate individual components of the project in units of time that all parties can understand and be confident in.  My preferred unit of time is four hour increments, so any component will take 4, 8, 12, 16, 20, etc., hours.  Small features that individually take less than your unit of time can be grouped in “feature sets”.

All components and feature sets should be able to be estimated and discussed as discrete items.  They should also be important and easy to understand for all stakeholders.  If a client does not understand what a certain component is, then that is a an opportunity for an important discussion.  Breaking the project down into these components makes it very clear which features support the project goals and which do not.

Risk

How risk is managed within a project can vary a great deal depending on factors such as client requirements and project management methodology, but it is always important to identify.  Estimating the risk involved with a project as a whole is often focused on the consequences of the potential outcome instead of the likelihood of that outcome.  “What happens if this fails?” and “What happens if this goes over budget?” are important questions, but are only part of the equation.  That is one of the reasons why decomposing a project into components is so important, it allows for the estimation of risk of individual portions of the project.  

Different methodologies use a wide variety of ways to communicate risk, but a very simple way is to just assign a low, medium, high rating to each component and feature set.  How this identification of risk is used depends on the project, but the exercise is important in itself.  An example might be a component called CRM Integration, where the developer has to integrate the new software they are building with the clients chosen customer relationship management software.  CRM integrations can be simple and low risk, but in this case it has been identified as high risk because the developer has never worked with this particular CRM and there are reports online of it being a difficult and poorly documented tool.  At the very least, identifying this high risk item should prompt a discussion with the client on how to lower the risk of this integration.  

Presentation of Scope

Once the project has been estimated to a high degree of confidence, it can be presented to the client with all the supporting documentation.  Ideally, the client and other stakeholders have been involved in the scoping process and this is just a formality.  It should be stressed that the project will be most likely to succeed if the scope is flexible.  Things will change throughout the project and that will have to be clearly communicated when it does.  When something deviates from the plan, have an open and honest discussion with the stakeholders.  Let everyone know what happened, and how the plan is changing to address the deviation.  

It can be daunting to estimate the scope of a project, but following this general process can greatly simplify the task.  Discuss goals, use IA to define content relationships, and decompose the projects into components to estimate cost and risk.  I am more than happy to discuss any of these concepts if you have questions.  Please feel free to reach out to me via email or on Twitter.

Contributing to Open Source

Open source software is taking the world by storm and by now, most of us use at least one open source tool every day. Joining the open source community for the first time can seem daunting. Even if you’re not a developer, you can still help the community of software that powers our lives every day.

This post is a text version of my talk given at WordCamp LAX 2017.  The slides can be found on SlideShare and a video version is coming soon on WordPress.tv.

For a long time, companies dominated software with proprietary offerings. This meant only a handful of developers could contribute and test before they released that software. This created problems because those developers could not replicate the environment of every one of their users or every use case. This meant more bugs in their software.

To contrast that, a popular open source project may have thousands of people contributing and testing. Thus a saying was born that, “given enough eyeballs, all bugs are shallow”. Firefox and WordPress are a couple examples of tools many of us use that are open source.

How do I add my voice to an open source project?

Before most bugs or new features become code, they are usually filed as an “issue” on the project. Filing an issue on a GitHub project is a good way to get the discussion going.

If you’re looking to contribute, search through the issues for the project you’re contributing to and see if there is any work already in progress.

If there is, great! Add your voice to the conversation and help keep the progress going. If not, now’s a good time to file an issue and start a dialog. As a note, it’s possible to contribute without going through this process. It’s also possible that after you spend hours working on your contribution, the project maintainers will decide that it’s not a good fit (see image below). Creating dialog around an issue before you start can help with this.

This is disheartenening and a waste of both your time and the maintainers. File an issue first and work with the maintainers to decide on a direction. Check for a CONTRIBUTING.md file that details exactly how you’re expected to contribute. When that’s taken care of, you can start your contribution.

Now, we’re ready to make a pull request and get our contribution merged in, right? Well, if you’ve never used git before to keep track of your code, let’s take a timeout for a brief primer on git.

Git is a way to control versions your code, saving checkpoints (called commits) one on top of each other in a tree-like formation. You can move between commits at any time and see the state of the project at the exact time that you made the commit. This makes git useful if you have to undo work or figure out exactly where a particular bug occurred. Each of these commits has a unique identifier, producing a structure like we see below.

To add our contribution to this project, we need to create a “fork”. A for is an exact copy of the project, but in our own GitHub account, so we can actually contribute code to it.

Now, since we’re working on a small addition, we want to create a branch. This is where the tree-based model starts to show. A branch is a separate chain of commits that won’t conflict with other contributors. This system is what makes git great for larger teams of developers. Git ensures that none of their work gets overwritten.

When we’ve got our contribution finished up on our branch, it’s time to get merging. On GitHub, we can make what’s known as a pull request. A pull request informs the owner of the original project that we’ve got a contribution we’d like to add.

The maintainer can review this, add comments, and approve or reject it. If it’s approved, it goes straight into the main project and you can see your contribution to open source! Otherwise, it might take a bit to get there.

For example, some projects run a suite of automated tests against anything that contributed<. For one pull request I made, it failed some of the automated tests, even though it shouldn’t have. I talked to the maintainers and got the issue resolved, but it was an unexpected roadblock. Because open source is public, you can see the whole discussion on GitHub.

Open source maintainers are very busy, especially on bigger projects. Even once you’ve gotten any issues with your contribution resolved, it might take some time to get it merged. Be patient. Make sure there’s nothing else the maintainers need from you as a contributor. If you’ve followed the process outlined here, your contribution has a much better chance of getting merged.

So if you’re going to contribute like we outlined above, you need to head over to GitHub and sign up for an account.  If you’ve never worked with git before, you will want to use a program like Sourcetree to make the process easier.

After you’ve got these two things, you’re ready to go. To practice, I’ve set up a repository that you can contribute to without having to write any code. You can read through CONTRIBUTING.md for a review of the process that we’ve outlined above.

– Fork the repository into your own GitHub account
– Create a branch for your contribution
– Edit the main guestbook file and add your name, city and date.
– Commit the changes to save your work.
– Create a pull request against my main repository and I’ll merge your contribution.

If you have any questions or get stuck along the way, don’t hesitate to reach out over email or Twitter

Serverless: The Least You Need to Know

Technology news has been filled lately with case studies of companies and developers taking their code “serverless” and saving time and money in the process. This seems to go against all traditional logic. How can server-side code run without a server? The answer lies in the fact that serverless infrastructure isn’t running without a server as the name implies, but rather the infrastructure is abstracted away.

Serverless infrastructure “allows you to build and run applications and services without thinking about servers.” (https://aws.amazon.com/serverless/).  In most cases, your code is deployed into a container which is stateless, lasts only as long as your code is running, and is fully managed by a third party.  This means, if you have a script to generate a thumbnail from a given full size image, you simply tell your infrastructure provider that the script is written in Python and then fire a request to the script. They take care of the rest and you only pay for the server while the script is actually running.  In this way, serverless architecture can makes the traditional “pay for what you use” model of the cloud even more precise.

If you’re not running servers, how are serverless applications built and delivered?  Let’s take our image thumbnail example.  We would build the code that can take in an image and generate thumbnail output and upload this into AWS Lambda (one of the more popular serverless providers) and set it as an AWS Lambda Function.  For optimal performance, we might want to hook it into S3 for storing the images before and after we run our function. We can run our function through either an API call or by triggering it from another Amazon service, such as S3 or or Amazon SNS (Simple Notification Service). Once our function is triggered, Amazon handles spinning up the infrastructure to run our code to completion, providing us any information on errors along the way.  Because Amazon handles the entire environment, no thought has to be given to the infrastructure. This is what makes it serverless.  After your code for this task has finished running and all the files are back in the correct place, your server is spun down and you’re only billed for the time your function took to execute.

Because Amazon handles the entire environment, no thought has to be given to the infrastructure. This is what makes it serverless.

As serverless becomes a more popular paradigm, more cloud providers are supporting this infrastructure.  Currently, Amazon Web Services has been pushing hard in this space with their Lambda service.  In addition, Google offers Cloud Functions and Microsoft has Azure Web Jobs.  While these are all similar, the best choice usually depends on which provider you are using for the rest of your infrastructure, as integrations are easier between Amazon products, for example, than trying to bridge an Amazon Service with Azure Web Jobs.

Although the serverless paradigm is very flexible, not every development use case is a good fit.  Some workflows would require chaining multiple functions together, which can be difficult given the current state of serverless technology. However, there are definitely some cost savings possible when using serverless architecture instead of having servers running when not in use.  Like previously discussed, image processing is one great use case for serverless.  Another use case for serverless has been the processing of log files or near-real-time site metrics and operational data.  Bustle (https://www.bustle.com/) has used AWS Lambda to process metrics coming in from their site without having to worry about scale.  The most important criteria here is that the operations can be run independently and fit into the existing workflow.

The easiest way to get started with serverless is to see if you can identify a piece of your workflow that fits the criteria for a serverless implementation outlined above.  Is there any piece of your business processes that can be run independently in the background and can be abstracted enough to not have to worry about server configuration?  If so, serverless might be a good fit for you.  If you’re not sure, we would love to talk to you about your workflow and chat about the cost savings running on a serverless architecture might bring to your business.