The past few weeks at Alpha Particle, we have been trying out “Prototyping Fridays” where we attempt to take a small idea that we’ve had or a new piece of technology we’ve been looking at and implement a “completed” project in the course of an afternoon. This post goes into more detail about one of these projects.
As the internet becomes more mobile-friendly and even mobile first, a common request from our clients is that their projects take advantage of user’s mobile devices. We find this works particularly well when supported by some sort of content management system, like WordPress or Laravel’s Nova.
A couple years ago, we built a prototype that showed how content could be published in WordPress and then exposed to the end user in a native mobile app, instead of on a website. However, technology moves fast and we decided it was time for an update to this prototype with one crucial addition: push notifications when a new post was published. We decided to use React Native for this project and got started.
Why React Native?
Anytime a developer has to write code that will run on multiple platforms, it’s a dream for us to be able to Write Once, Run Anywhere (WORA). This is a promise that has been made by multiple platforms for many years, including React Native.
React Native takes Javascript (specifically React) that we’re already familiar with, and gives us the ability to package it up as a native app for both Android and iOS that can be published in the respective app stores and should behave just like and Java (for Android) or Swift (for iOS) app. One codebase, multiple outputted apps. At least that’s the idea.
In practice, there are still specific configuration steps you have to take for each platform. Whether that’s pulling in specific Android libraries or editing configuration files for specific iOS behavior, it’s not truly WORA. That said, it still greatly reduces the amount of duplicate code you have to write and does lend that familiar Javascript interface to building native apps.
When I last worked with React Native, I didn’t feel it was completely production ready, while with the current state of the codebase I’d be more than comfortable building a production app with the same toolchain we used for this prototype.
Defining the Features
This step turned out to be relatively simple. We needed a main screen for the app, which displayed the list of the posts on the Alpha Particle blog, and we needed support for push notifications when a new post was published. This was definitely the more complicated step, but luckily there are platforms to help with this.
For this prototype, we chose OneSignal because of the amount of platforms they support (with React Native being one of these) and their very generous free plan.
Building the App – Main Screen
One of the biggest improvements I saw since our last project with React Native was the improved documentation. I was able to work through getting the project set up and everything imported properly using the React Native documentation. Another difference between now and when we last worked on the project is that WordPress now has a native REST API, which provides JSON for our app to consume. Hooking our boilerplate React Native app up to our WordPress API led us to our first working app screen:
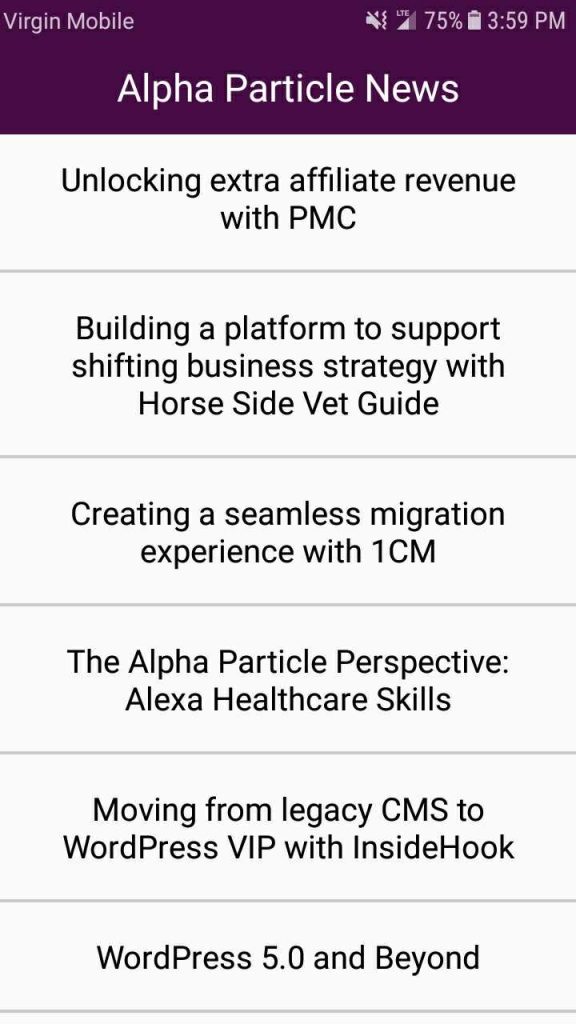
There’s nothing fancy going on here, just a list of the title of each of our blog posts. If we publish a new post and then relaunch the app, this list will update. React Native makes this list scrollable right out of the box, so we’re all set there as well.
Building the App – Icons
One of the pieces of building an app that can’t be cross-platform, even with React Native, is icon generation. Since each platform expects different icons and expects them in a slightly way, this is still a platform-dependent process. For Android, you can generate your icons with Android Asset Studio and for iOS you can use Icon Set Generator.
Building the App – Push Notifications
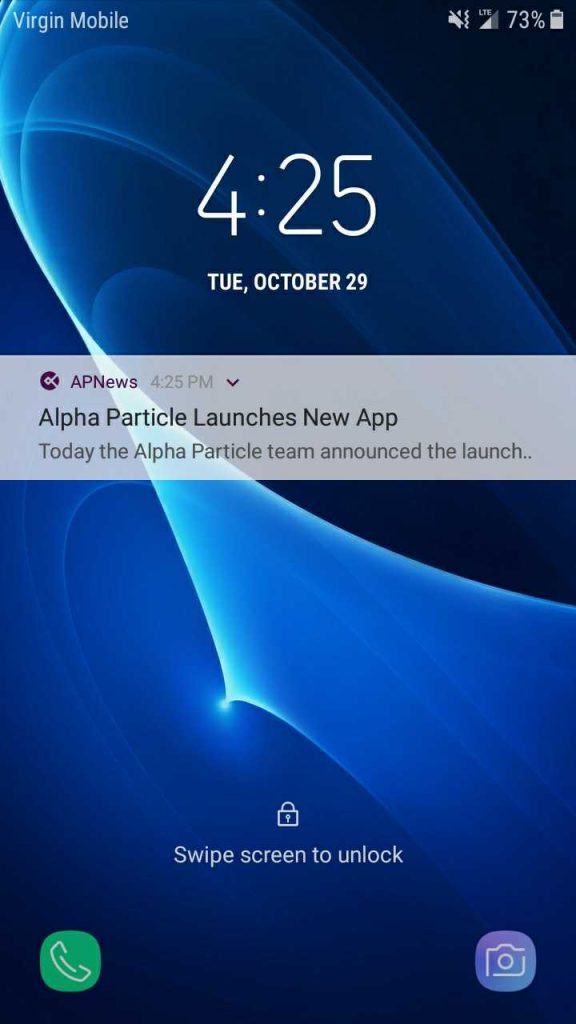
The last piece we needed for this prototype was to receive push notifications when new blog posts were published. This meant we needed to set up OneSignal to handle push notifications within the app, as well as WordPress to let OneSignal know when a new post had been published.
On the WordPress side, we built a simple plugin that calls the OneSignal API when the status of a post transitions from anything other than published (draft, private, etc…) to published. Our plugin passes the title of the post and the post excerpt through to OneSignal and tells it to broadcast a push notification with that content to all the phones that have the app currently installed.
On the OneSignal side, we had to integrate the React Native SDK into our codebase. Once we did that, OneSignal handled registering a user’s phone in OneSignal when they first open the app. And once their phone is registered with OneSignal, they will be able to receive push notifications.
Once this was all built, we made a few more cosmetic tweaks and had real time push notifications working!
Looking to start a mobile project or implement some of these mobile-first features in your existing project? Use the contact form below or email hello@alphaparticle.com and let’s talk about how we can help!